Universal Connectors
Introduction
Universal Connectors are generic modules used to connect to REST APIs. Using the Universal Connector (UC) wizard you can build your own reusable modules to simplify getting or sending data from/to external APIs when building flows in the Flow Studio. A UC can use settings provided by the user or data from flow messages when building the API calls. You can also provide your own custom icon and documentation for UCs. Once published a UC will look just like any other module in the Flow Studio library. UCs also support versioning, so you can update the module over time and then select the version to use when configuring the module in the Flow Studio editor.
Note 1: You must have permission to manage Universal Connectors to be allowed to make your own, or modify existing, UCs. However, all users can use the modules when creating flows.
Note 2: This tool is intended for users with basic understanding of REST APIs and API documentation.
Parameters
A key concept when building a UC is the parameter syntax. When you enter a name inside curly braces somewhere in your API request configuration, like {param1}, param1 will be treated as a configurable parameter and the actual value will be assigned at runtime. Parameters can be used in URLs, in headers, in query parameters and in the message body for POST/PUT requests. There is no limit on the number of parameters that can be used. For each parameter you then decide from where to get the actual value. The options are:
- User setting - The parameter will be presented in the module UI so that the user can enter a value. You can provide a default value. Note that user settings are not allowed to be left empty when using the module in the Flow Studio.
- Message parameter - The value will be taken from an incoming flow message. The property on the message must have the same name as the parameter and be located at the root of the message.
- User setting if set - The parameter will be presented in the UI. If no value has been entered it will be taken from the incoming message, same restrictions as above.
The Wizard
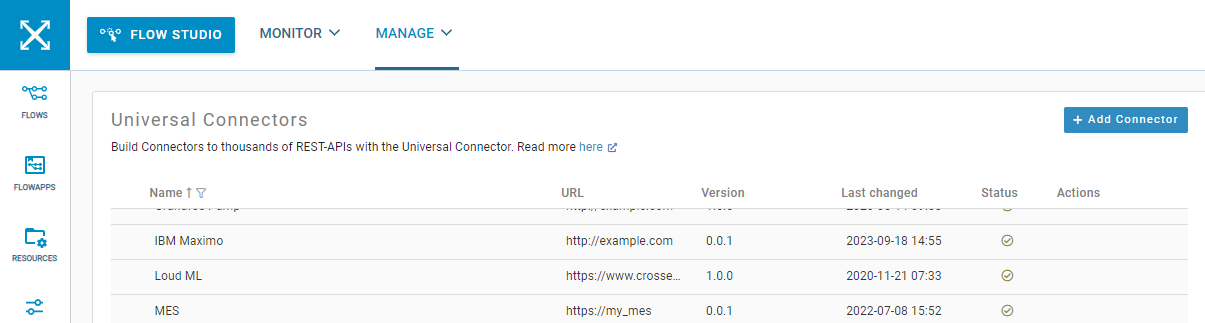
To simplify the setup of UCs a wizard is available that will take you through seven steps to create your own module. The Universal Connector page can be found in the top-level menu. The table shows all currently defined UCs. To build a new UC, click on '+Add Connector' in the upper right corner, this will open the wizard. Follow the steps described below to complete your new module. Inside the wizard you can use the Next/Previous buttons or click on any of the icons at the top to jump between the steps.
1. General
In this step you define the following:
- Name - The name of the module. This is used in all references to this module, like in the UC table, in the module library in the Flow Studio and so on. Since this name will be shown together with the icon in the Flow Studio you should preferably keep the name short. Only characters, numbers and space are allowed in names.
- Version - The version number of the module in x.y.z syntax. When creating a new version of an existing UC the version number must be higher.
- Module Type - This is a legacy setting that has no major impact on the functionality of the module. If you set it to 'Input' the module will get a 'Target Property' setting. If you set it to 'Output' the result of the API call will be assigned to the default 'data' property.
- Icon - Select a custom icon for your UC. Load a png file from your local drive using the Select icon button. The image will be scaled to fit on the module in Flow Studio, but for best results your image should be square and not have a higher resolution than 256x256 pixels. It is optional to specify a custom icon. If no icon has been loaded the Crosser icon will be used. However, using your own icon is definitely recommended since it will make it a lot easier to find your module when building flows.
- Description - This is an optional field where you can add a description of your UC for future reference. It is not used outside the wizard.
- Categories - Currently not used. Your UCs will end up in the 'Custom' category in the Flow Studio module browser.
2. Authentication
If your API requires authentication, it is set up in this step. If no authentication is needed you can skip this step.
If your API uses basic, bearer or OAuth2 authentication you have the option to get the credentials from the central credentials store (see Credentials for more information). The only thing you need to do then is to select 'API key' for bearer authentication, 'Username and Password' for basic authentication or one of the supported OAuth methods in the Credential drop-down list. When a user uses this module in the Flow Studio the available credentials will be presented in a drop-down and added to the API request.
If your API uses some other kind of authentication you can add the required headers or query parameters by filling out the relevant fields and click the + button on the right. Any number of headers and query parameters can be added and the parameter syntax described above can be used to fill-in any part of the authentication settings when the module is used. If your API uses data from one of the supported credential types, but in a non-standard way, you use the option 'Use credential as setting'. Then the tool will not automatically use the credentials with the standard methods, but you then have the credential values available so that you can use them as parameter values to create custom authentications. Build the request as required by your service by using parameters. Then on the Configuration step, select 'User setting' as source, 'Credential' as type and then the value you want to assign to this parameter from the list of available values in the credential from the 'Requirements' drop-down. The user will be presented with a Credentials drop-down when using the module and the available credentials of the type you have selected will be shown. The content of the selected credential will however be used in a customized way, based on your configuration.
If you are connecting to a service that uses e.g. self-signed certificates you can enable 'Allow untrusted certificates' to disable certificate validation.
3. Configuration
This step is where you configure the main parts of your API request. The following settings are available:
- URL - The URL for your endpoint. When the module is used this setting must be a complete URL including path, ie https://api.example.com/ is a valid URL, while https://api.example.com is not. URLs can be configured using parameters, eg https://api.example.com/{resource}, where resource will be replaced at runtime depending on how this parameter has been configured (see next step). If you want to make the whole URL configurable, just enter a parameter like {url} in this field.
- Action - The HTTP verb (action) to use. If an action where a payload body can be used, like POST/PUT, a Body field is shown as well
- Headers and Query parameters - Add any headers or query parameters needed by filling out the relevant fields and click on the + button. Multiple headers and query parameters can be added and configurable parameters can be used by using parameter syntax described above, to adjust the request when the module is used.
- Body - For actions that require a body payload the Body field is used. You can enter any text here and also combine it with configurable parameters. If you want the whole body to be taken from the incoming message, just enter for example {body} and set the body parameter to Message parameter. Then any data assigned to the body property on the incoming message will be inserted as the body payload.
4. Usage settings
In this step you configure any parameters you have used when configuring your API request in the previous step. If you haven’t used any configurable parameters you can skip these steps.
If your selected 'Input' as module type in the first step will be one default parameter called targetPropertyParameter, so that the user can chose the message property to write the result of the API request to. The only thing you can change on this parameter is the default value and its position in the UI, if there are more parameters, see below.
For each parameter you must specify the following:
- Source - Where to get data from for this parameter. Options are User setting, Message parameter, User setting if set, see the introduction above for more information on these choices.
- Display name - [User settings only] The text displayed above the parameter input field in the module UI.
- Type - [User settings only] The expected data type, the choices are: String, Number or Bool
- Requirements - [String and Number User settings only] Specify min/max lengths for strings or min/max values for numbers. These settings are optional.
- Default value - [User settings only] Default value for the parameter. May be left empty, but note that a value must be entered when using the module. It is not allowed to have empty input fields on a UC module in a flow.
- Help text - [User settings only] Text written under the input field in the UI. Use this to help the user enter the expected data. This setting is optional.
- Purpose - [User settings only] Text used to describe the parameter in the Settings table on the Documentation tab in the module UI (see also the Documentation step below).
The order of the settings in the UI can be changed by using the up/down arrows to the right of each setting.
5. Documentation
The documentation step is used to add in-module documentation, i.e. documentation available to the users in the Flow Studio. The structure is set up in the same way as for modules in the standard library, so that users can easily recognize the documentation. The left-hand side of this page is the input for markdown text and the right-hand side shows the result. There are two sections for the documentation:
- Connector description - This is the text shown when hovering the module in the Flow Studio module browser
- Module documentation - This is the text shown on the Documentation tab of the module settings window. It is divided into three sections where the first is the introductory text. Here you typically describe what the module does and when to use it. The second part is the Settings table, this is generated automatically based on information already entered. The last section is used to describe what input messages this module expect, what the output will look like and preferably some examples showing the use of the module.
6. Release Notes
Here you can describe any changes introduced with new versions of the UC.
7. Summary
The Summary step combines all information entered and shows what the module will look like in the Flow Studio, with the module icon, hover text, Settings and Documentation UI. If you are happy with the result, press Create and the module will be built.
Publishing and Versions
When you have created a UC it must be published before it can be used in the Flow Studio. In the UC table hover over the UC version you want to publish and click on the 
icon to the right. The UC will now be published and you will see it in the list of modules on the Modules page, listed as a Custom module which means that it is only available to users within your organisation.
It is not possible to modify a published UC but you can update it by creating a new version. Click on the  '+' icon to the right of the current version and a new version will be created and opened in the wizard. When you are done with updating the new version it must be published, as above, before it shows up in the Flow Studio. When adding a UC module to a flow it will by default get the latest version. If you already have a UC in a flow and want to update to the latest version, open the settings UI and use the drop-down at the top to select the new version.
When you create a new version of a UC some settings cannot be changed: the name of the module and its type (Input/Output). If you want to change any of these you can create a new UC, but use a version of an existing UC as the starting point, by clicking the  icon to the right of the version.
Search Documentation
Page Sections