Resources
Introduction
The Control Center service supports the use of centrally managed resources. A resource is something that is either used when configuring modules in Flows, such as OPC UA tag lists or Modbus register mappings, or files that need to be downloaded into the Nodes when deploying Flows. File resources can then be accessed from within modules when they run on a Node, for example Python or C# scripts that are imported in the respective code modules, machine learning models that are used inside a code module or a CSV file with static data that is accessed with the CsvReader module. Resources are added to Flows from within the Flow Studio. Module specific resources are added through the respective module settings. File resources are added from the Resources panel. All resources used by the Flow are managed in the Resources panel, where new resources can also be created.
The Resources page in the Control Center web UI is used to manage all available resources. The main page shows all currently available resources and new resources can be uploaded from here. A resource can be created by uploading a file from local storage, or by entering the information directly in the UI. If you no longer want a resource to be available there are two options:
- Archive the resource. If the resource is used by Flows that are, or have been, deployed (read-only) you can archive the resource. This will block the resource from being used in new Flows or versions, but existing Flows can still download the resource.
- If the resource is not used by any deployed Flows can can also Delete the resource from the system.
Some general things to note about resources:
- All resources have a name. This name is used when referring to the resource in the UI, e.g. on the main resource page and when selecting the resource for use in a Flow. Resources that are downloaded into the Nodes, such as file and script resources, also have a local name. This is the local filename used to refer to the file from inside a module. See below for more details on how this is used for the different resource types.
- Resources can be version controlled.
- Custom metadata can be added to the following resources: OPC UA, S7, Modbus, Rockwell.
- Once successfully created a resource cannot be changed or removed, it can however be archived. The reason is that an uploaded resource may be used in a Flow and changing or removing the resource may have undesirable effects on the running Flows.
- An archived resource cannot be used when configuring a new Flow version. Existing Flows that use the resource will still get access though.
- Resources can be downloaded to your local computer, e.g. to modify it and upload a new version. There is however a size limitation and files larger than 10MB cannot be downloaded.
- Small resources (<1MB) can be viewed in the UI and the content can be copied into a new resource, which is useful for small changes.
Note: You must have permission to manage Resources to be allowed to add resources. However, all users can use the resources when creating Flows.
Add a new resource
There are two places where resources can be added: In the Flow Studio and on the Resources page.
To add a new resource in the Flow Studio, open the Resources panel using the Project menu bar along the right side of the screen:
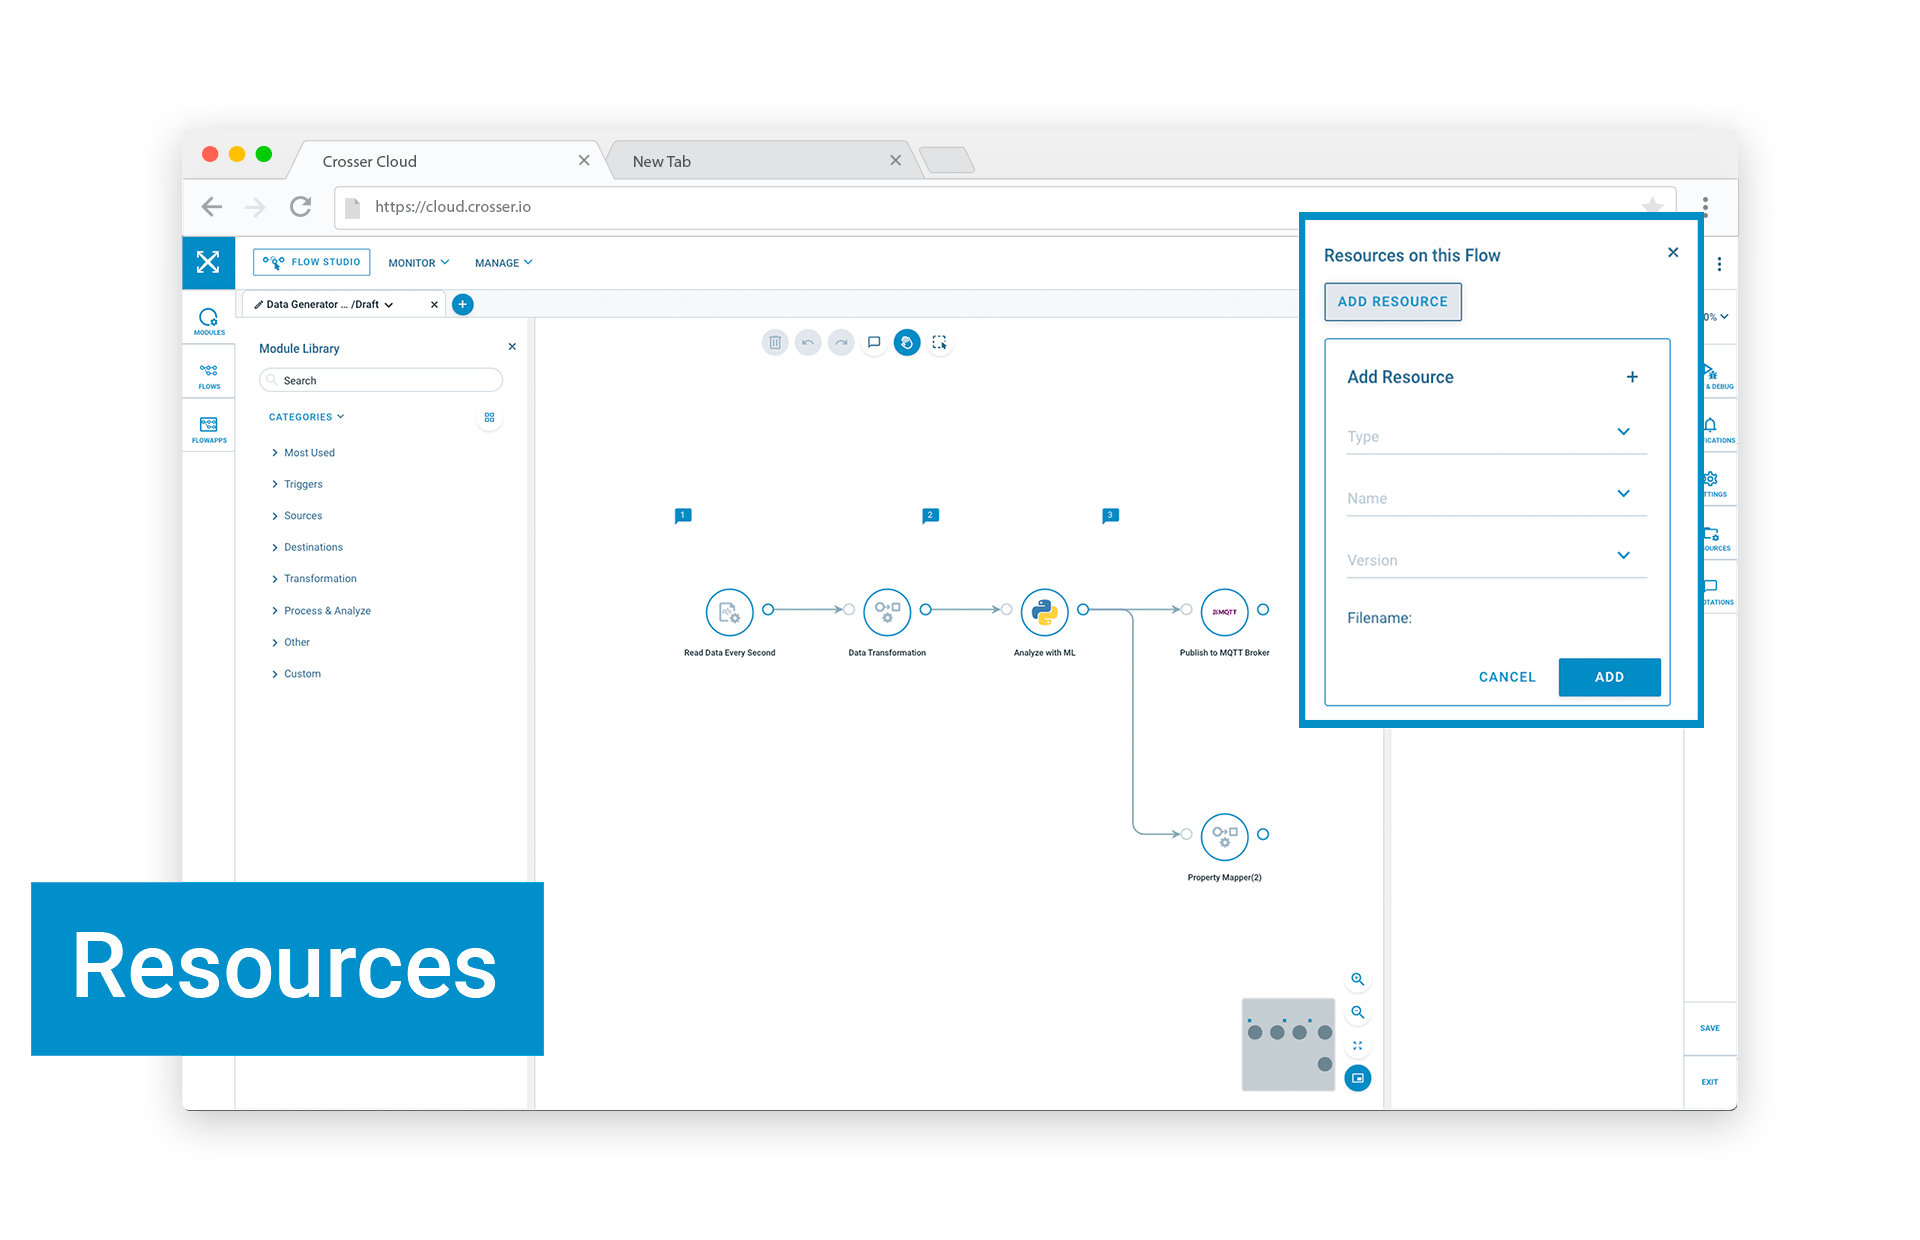
Then click on “ADD RESOURCE” and then on the ‘+’ button. This will open up the Create Resource panel.
When adding a resource inside the Flow Studio it is automatically added to the current Flow.
Alternatively you can add resources on the Resources page by clicking on
Fill in the required information and either enter the data in the UI (‘Code’) or upload an existing file.
Resources added on the Resources page must be added to Flows that need them in the Flow Studio, using the Resources panel.
Resource types
The following sections describe how to create and use the different types of resources.
File resources
A file resource is any type of file that is needed locally on a Node, by the Flow running on that Node. Examples are machine learning models that are loaded into some ML framework in a PythonBridge module or a CSV file accessed by the CSV Reader module. The system makes no assumptions on format or content of these files, it will just make sure that these files are downloaded to any Node that runs Flows that reference these resources.
File resources must have a local filename, which can contain a path. A local name can only include alphanumeric characters plus ‘.’, ‘_’, ‘-’ and ‘/’, ie ‘a/b/c/test.csv’ is a valid name, while ‘a/b/c/test 2.csv’ is not. When accessing a file from within a module in a Flow, e.g. the CSV Reader, it should be referenced using a base path of ‘data/Flowresources/’, ie the file above will be available as ‘data/Flowresources/a/b/c/test.csv’.
You can copy the full path to the file using the 'copy' button to the right of the filename on each resource in the Resources panel.
Python and C# Script resources
Python/C# script resources are very similar to file resources, ie they will be downloaded to the Nodes where they are referenced. The Control Center will not validate the content. The difference is that these resources are intended for use in a specific module, namely the PythonBridge and Csharp modules respectively.
These modules will find the resources in the predefined location. For example, if a Python resource is uploaded with a local filename/path of ‘mylib.py’, it can be used in the PythonBridge module with a standard ‘import mylib’ statement.
To learn more how to use the Python Bridge module, have a look at our knowledgebase article:
https://www.crosser.io/knowledgebase/using-the-python-bridge-module/
OPC resources
OPC resources are tag lists that can be used when configuring the OPC UA Subscriber and Reader modules, instead of typing each tag in the module UI. When using an OPC resource all the tags in the resource will be used by the OPC UA modules. Any tags entered manually in the UI, or loaded dynamically from a Flow message, will be added to the list of tags in the resource file. The format of OPC resources is a JSON array with an object per tag:
[
    {
        "NodeId": "ns=4;i=1244",
        "path": "/4:Boilers/4:Boiler #1/4:PipeX001/4:FTX001/4:Output",
        "customType": "tempSensor",
        "customScale": 1.5
    },
    {
        "NodeId": "ns=4;i=1245",
        "path": "/4:Boilers/4:Boiler #1/4:PipeX001/4:FTX001/4:Output",
        "customType": "pressureSensor",
        "customScale": 1.5
    }
]
The NodeId property is mandatory and should follow the OPC UA syntax for Node IDs.
You can add custom metadata to every object in the resource file which will become part of the outgoing message.
Any other properties added will be included in the output message for the tag. Custom properties can for example be used to add metadata to allow filtering/grouping of tags in other modules in the Flow, or apply per tag specific scaling/conversion parameters that can be used in other modules to change the values.
This format is also used when loading tags dynamically from Flow messages and matches the output produced by the OPC UA Browser module. Note though that the output of the OPC UA Browser contains several properties in addition to NodeId and these will be treated as custom properties by the Subscriber and Reader modules. If you don’t want to have these properties in the output they must be removed with a Property Mapper module between the Browser and Subscriber/Reader module.
Modbus resources
Modbus resources are used to specify the register mappings for different PLCs. When the resource is used in the Modbus Reader module, all of the listed tags will be retrieved. Additional tags can be added in the module UI. A JSON file is used to define these mappings. Any properties in addition to the default tag properties described below, will be treated as custom metadata and will be added to the messages.
Example Modbus resource:
{
    "name": "PLC1",
    "unitId": "1",
    "tags": [
        {
            "id": "tag1",
            "modbusDataType": "Int",
            "modbusFunction": "ReadHoldingRegisters",
            "address": "0001"
        },
        {
            "id": "tag2",
            "unitId": "2",
            "modbusDataType": "Byte",
            "modbusFunction": "ReadDiscreteInputs",
            "address": "001B"
        }
    ]
}
Note: The address and unitId must be specified in hex, ie. decimal '27' would be '1B' in hex resulting in '001B' in the resource file.
A Modbus device (PLC) is specified as a JSON object which must have at least a name and at least one tag in the tags list. Optionally the unitId can be specified if something other than the default value of 1 is needed.
You can add custom metadata to every object in the resource file which will become part of the outgoing message.
A tag (register) is defined by the following parameters:
- id - Unique name of the tag, will be included in the message.
- name - Optional name of the tag, will be included in the message. If not specified, 'name' will be set to 'id'.
- modbusDataType - The type of data to read, could be one of: `Byte`, Int, UInt, String, Short, UShort, Float and Double. This setting will affect the number of bytes to read and how they should be interpreted by the module.
- modbusFunction - Defines what function code to use (address space), could be one of ReadDiscreteInputs, ReadHoldingRegisters, ReadCoils and ReadInputRegisters.
- address - The starting address of the data in hex. (decimal address 27 would be 1B in hex resulting in 001B which is expected in the resource file).
- length - Integer (>=1), only used with String types to specify the number of characters to read.
- unitId - (optional) Will override the global unitId for this tag/register. Must be specified in hex.
S7 resources
S7 resources are used to specify the register mappings for different Siemens S7 PLCs. When the resource is used in the S7 Reader module, all of the listed tags will be retrieved. Additional tags can be added in the module UI. A JSON file is used to define these mappings. Any properties in addition to the default tag properties described below, will be treated as custom metadata and will be added to the messages.
Example S7 resource:
{
    "name": "Demo S7 PLC",
    "type": "S7300",
    "tags": [
        {
            "id": "tag1",
            "name": "ValveTemp",
            "s7DataArea": "Input",
            "s7DbAddress": 0,
            "s7StartAddress": 0,
            "s7Type": "Int"
        },
        {
            "id": "tag2",
            "name": "ValveOpen",
            "s7DataArea": "Input",
            "s7DbAddress": 0,
            "s7StartAddress": 2,
            "s7BitAddress": 5,
            "s7Type": "Bool",
            "tagCount": 1
        },
        {
            "id": "tag3",
            "name": "Machine",
            "s7DataArea": "DataBlock",
            "s7DbAddress": 0,
            "s7StartAddress": 10,
            "s7Type": "String",
            "length": 25
        }
    ]
}
A S7 device (PLC) is specified as a JSON object which must have at least a name and at least one tag in the tags list.
You can add custom metadata to every object in the resource file which will become part of the outgoing message.
A tag (register) is defined by the following parameters:
- id - Unique name of the tag, will be included in the message.
- name - Optional name of the tag, will be included in the message.
- s7DataArea - One of Input, Output, Memory or DataBlock.
- s7DbAddress - Integer selecting the Db (only used when s7DataArea is DataBlock).
- s7StartAddress - Integer setting the start address within the selected data area.
- s7BitAddress - Integer (0-7), only used with Bool types to specify the bit to use within the selected byte.
- s7Type - The type of data to read, could be one of Bool, Byte, Word, DWord, Char, SInt, Int, DInt, USInt, UInt, UDInt, Real or String. This setting will affect the number of bytes to read and how they should be interpreted by the module.
- length - Integer (>=1), only used with String types to specify the number of characters to read.
Rockwell resources
Rockwell resources are used to specify the register mappings for different Rockwell/Allen Bradley PLCs. When the resource is used in the Rockwell Reader module, all of the listed tags will be retrieved. Additional tags can be added in the module UI. A JSON file is used to define these mappings. Any properties in addition to the default tag properties described below, will be treated as custom metadata and will be added to the messages.
{
    "tags": [
        {
            "id": "tag1",
            "name": "ValveTemp",
            "rockwellTagName": "Tag1",
            "rockwellType": "int"
        },
        {
            "id": "tag2",
            "name": "ValveOpen",
            "rockwellTagName": "Tag2",
            "rockwellType": "bool"
        },
        {
            "id": "tag3",
            "name": "Name",
            "rockwellTagName": "Tag3",
            "rockwellType": "string"
        }
    ]
}
A Rockwell device (PLC) is specified as an object which must have at least one tag in the tags list.
You can add custom metadata to every object in the resource file which will become part of the outgoing message.
A tag (register) is defined by the following mandatory parameters:
- RockwellTagName - The name of the tag, as defined in the PLC, will be included in the message.
- RockwellType - Data type of the tag, as defined in the PLC. One of sint, int, dint, lint, real, lreal, bool, string. Will be included in the message.
OSISoft Pi WebAPI Subscriber resources
The OSISoft Pi WebAPI Subscriber resources specify the tag configuration for monitoring changes on an OSISoft Pi WebAPI Server. When used in the OSISoft Pi WebAPI Subscriber module, these resources set up a subscription for each listed tag. All changes in the specified tags are received as messages from the OSI Server.
Example OSISoft Pi resource
  "dataServers":
    {
      "webId": "F1DSA_IIvCccC0KbowWzAt8ruAMTAuMC4wLjI",
      "name": "Factory1",
      "items": [
        {
          "name": "BA:LEVEL.1",
          "webId": "F1DPA_IIvCccC0KbowWzAt8ruABwAAAAMTAuMC4wLjJcQkE6TEVWRUwuMQ",
          "metaData": { "foo": "bar" }
        },
        {
          "name": "BA:CONC.1",
>          "webId": "F1DPA_IIvCccC0KbowWzAt8ruACAAAAAMTAuMC4wLjJcQkE6Q09OQy4x",
          "metaData": { "foo": "baz" }
        }
      ]
>    }
  ]
}
A JSON file defines the configuration for each tag to be subscribed to. Note: While webId for each dataServer and tag is optional, it is recommended to include it for optimized performance, as omitting webId can significantly slow down the subscription setup.
The resource file supports configuring multiple dataServers, each containing its own list of tags, allowing for efficient data retrieval across multiple servers within a single configuration file.
In this resource file, dataServers represent OSIsoft PI data servers, each defined as a JSON object. Each data server must include a name and at least one tag in the items list. The webId of the data server is optional but recommended to improve performance. Custom metadata can be added to each item object, which will appear in the outgoing messages.
Each tag (or item) has the following parameters:
-
name: The unique identifier for the tag, required for every tag.
-
webId: The unique identifier within OSIsoft PI for efficient lookup, optional but improves performance if included.
-
metaData: Optional custom metadata associated with the tag. This metadata is added to the outgoing message to provide additional context.
This resource format enables configuration of multiple data servers, each with their own tags, to subscribe to updates across a network of OSIsoft PI servers.
AVEVA Historian Reader resources
The AVEVA Historian Reader resources specify the tag configuration for retrieving data from an AVEVA historian database. This module can either fetch the latest data entries or retrieve values within a defined historical time window, starting from a specified offset from the current time.
Resource File Structure
A JSON file defines the tag configuration, where each tag must include a name field. Additional fields can be added to provide metadata that will accompany the retrieved data in the output.
{
    "tags": [
        {
            "name": "heater_001.sensorfault",
            "machine": "alfa"
        },
        {
            "name": "heater_002.sensorfault",
            "machine": "beta"
        }
    ]
}
This resource file enables efficient organization and retrieval of data for multiple tags in the Aveva historian, with metadata that adds useful context to the output. Each tag’s metadata will be included in the data messages returned by the module.
Search Documentation
Page Sections