Message Queues and Retries
Modules in a Flow will do something when they receive a message, but what happens if the module is not ready when a message arrives? This could be because an output module is waiting for a response from an external system, or when a processing module is not done with the processing of the current message. This is where message queues come into play and this article will explain how these queues work and how to configure them for different use cases.
Let’s start with the question: what happens when a module wants to send a message to the next module in the Flow and that module is not ready to accept the message? The answer is that each module has a message queue at its input which is used to hold messages waiting to be processed. As we will see this queue can also be used to resend messages in case a delivery fails.

Crosser Modules | Message Queue
Queue settings
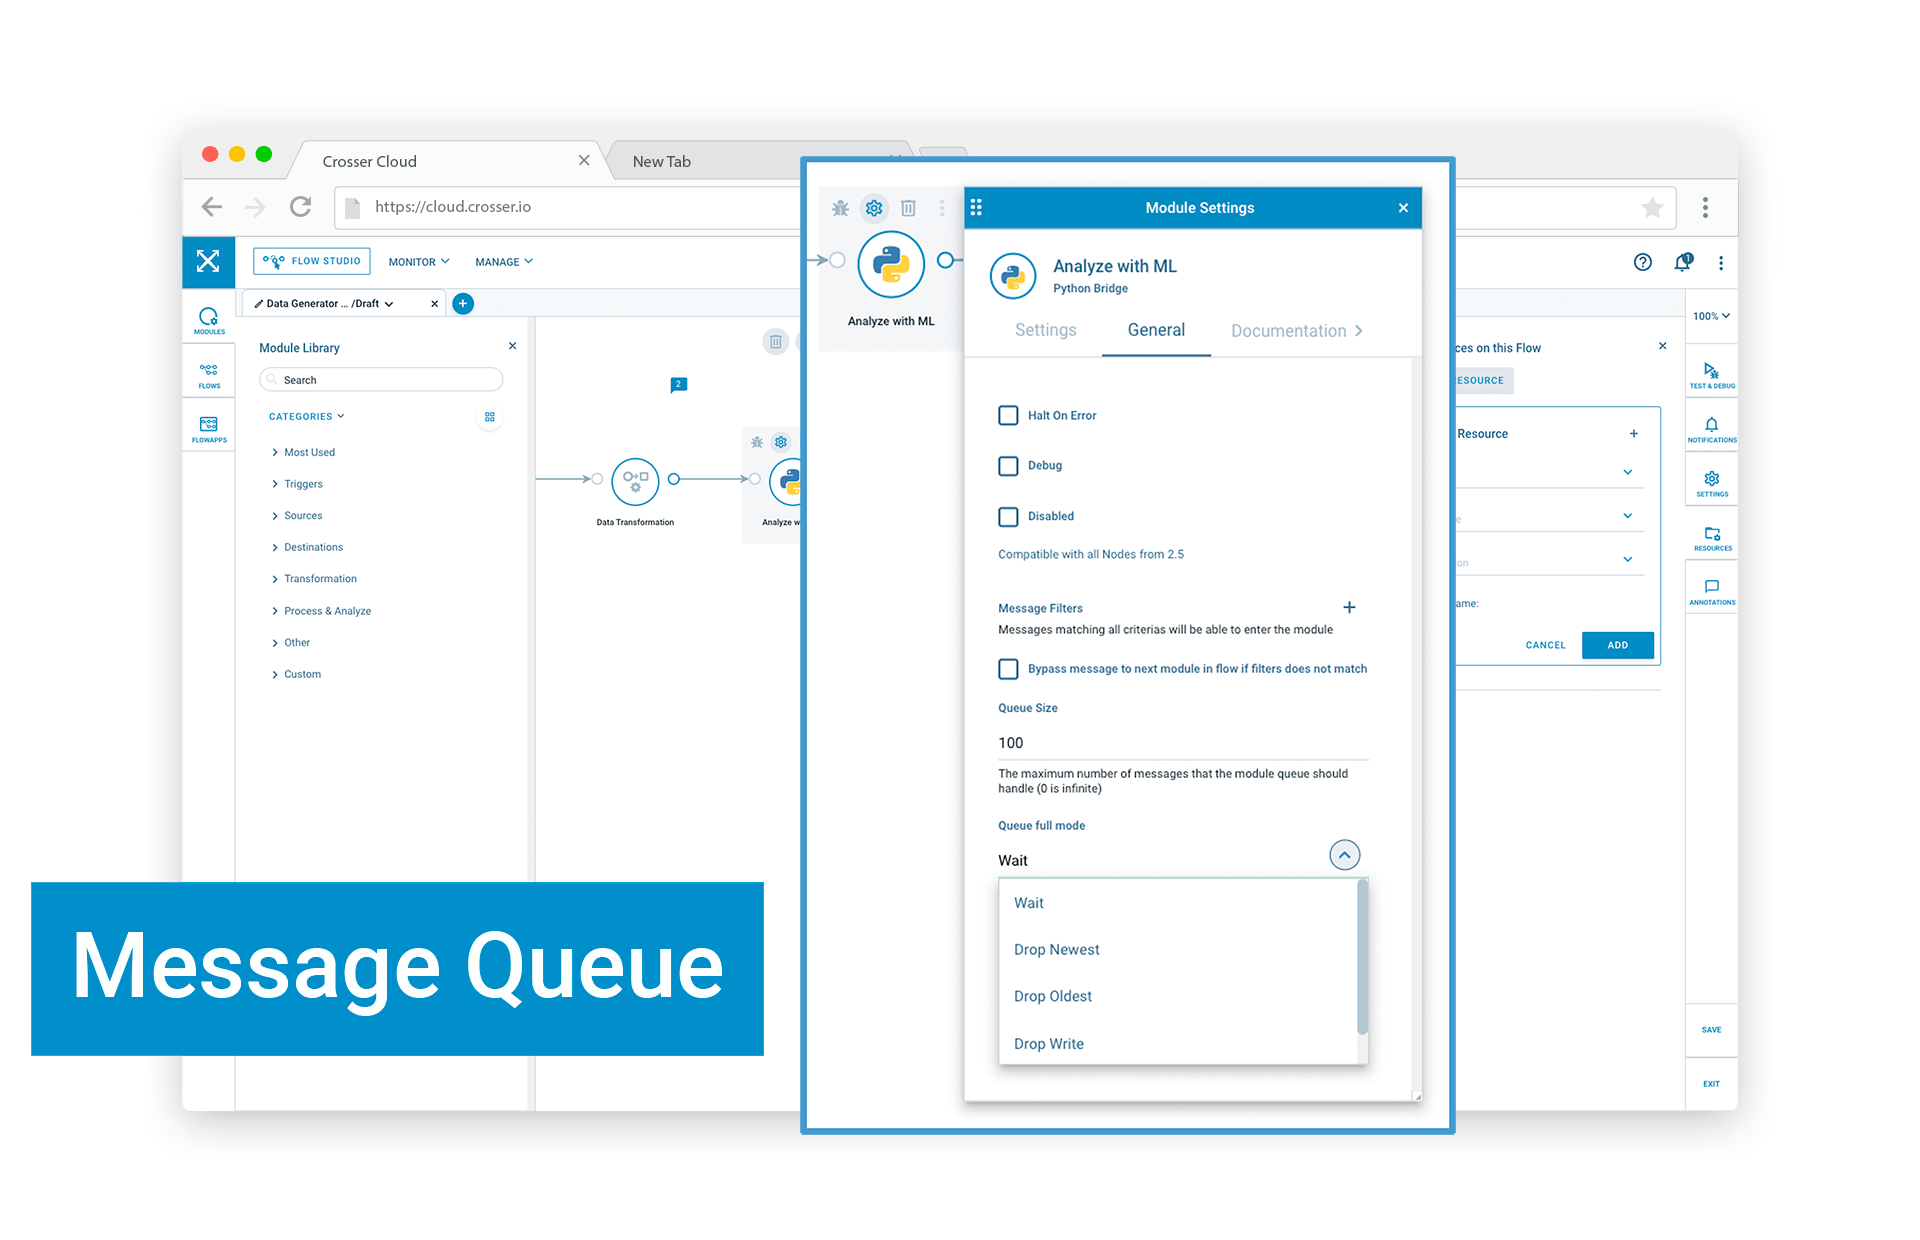
The settings that control the queue behavior of each module can be found on the Genera tab in the module settings panel. There is also a global Disable Queues setting in the Flow Settings panel. The following paragraphs will explain these settings:
Retries (requires Node version 2.6+ to be set on the Flow)
The first use case where queues can be useful is when an output module fails to deliver a message to the external system. This could be due to network issues or because the external system is overloaded. The queue on the output module can then keep the message in the queue until it has been successfully delivered.
This mode is enabled by setting the Max number of Retries setting to a value larger than 0. If a message delivery fails the module will then retry the specified number of times. If the message is still not delivered when the max number of retries is reached the message will be dropped from the queue (see also Persistent queues below).
There are two other settings that control the behavior of the module in this mode:
-
Minimum Delay Between Successful Messages in Milliseconds [default: 0] - If the external system cannot cope with high message rates this setting can be used to ensure at least a minimum delay between each successful delivery. If the Flow produces bursts of messages increasing this value will smooth out the external requests.
-
Retry Delay in Milliseconds [default: 1000] - In a similar way this setting is used to introduce a delay between each retry attempt, in order to not overload the external system.
Queue modes
Each message received by a module ends up in its input queue, except when queues are disabled (see below). In many cases the messages just stay a very short while in the queue before being picked up by the module for processing. The queues are then transparent and not something you need to consider. Occasionally though messages can start to build up in the queues. There are two main situations when this might happen:
-
An output module is waiting for a slow external system.
-
A burst of messages are created by a module in the Flow, e.g. when iterating over messages in an array using the Array Split module.
Depending on the number of messages produced the queue may never reach the full state and you won't notice that messages are piling up. The default size of the queues is 100 messages which handles most situations.
In case the queue becomes full the selected queue mode will determine what to do with additional messages that previous modules want to add to the queue. The following options are available:
-
Wait - This is the default setting and will inform the previous module that it needs to wait (back pressure) until there is free space in the queue before the message can be added. This is in most cases the best option since no messages will be lost. Letting previous modules wait is not a problem as long as the bursts are of reasonable size and the average message rate is still manageable by the Flow. When running Flows in a remote session you will see warnings when a queue gets full also in Wait mode, but as long as it’s only modules receiving bursts, e.g. after an Array Split module, this is ok. If all modules back to the first module in a Flow start to trigger warnings it means that the Flow is not capable of managing the average message rate and adjustments to the queue settings will be needed. No warnings for full queues are reported from deployed Flows in this mode, since in most cases it’s not an issue.
-
Drop Newest - In this mode the module will drop the latest message added to the queue, to make room for the new message to be added.
-
Drop Oldest - In this mode the module will drop the oldest message added to the queue, to make room for the new message to be added.
-
Drop Write - In this mode the new message to be added will be dropped, i.e. all messages already in the queue will remain.
Queue size
If the average message rate is higher than what the Flow is capable of processing the only option is to drop messages, to lower the rate to a manageable level, using the queue modes described above.
However, if the queue becomes full because the bursts are larger than the default 100 messages but the average rate is still manageable, changing the queue size will be the best approach. In these cases the queue size should be changed to a slightly larger value than the maximum anticipated burst size. Check the Flow in a remote session to verify that no warnings about full queues are reported.
Persistence (requires Node version 2.6+ to be set on the Flow)
With the default settings message queues are held in memory. Starting with Node version 2.6 it is now possible to persist the queues to disk. There are two main reasons why you may want to do this:
-
In case the host server, the Node or the Flow crashes any undelivered messages will be picked up from disk when the Flow is restarted.
-
If you run out of retries the messages are not dropped, but instead moved to a Dead letter queue on disk and can be picked up again using the Node API. This is an advanced use case that requires custom application development to manage the dead letter messages. By default dead letters will be kept for 24 hours. Refer to the API documentation in the Node’s local web UI or come back to Crosser for more information.
Persistent message queues are enabled by checking the Persistent Messages Enabled box in the module settings.
Note: Enabling persistent messages on a module means that all messages received by this module are written to disk. This will have a major performance impact and could also result in extensive disk operations, which could be devastating on low-durability SSDs. Persistence is primarily useful on output modules and should be used with care. We do not recommend to use persistence in streaming- and high-frequency use cases.
Disabling queues
In most situations queues are beneficial and will make your Flows run more efficiently. There are however some situations where you might want to turn off queues, especially in remote sessions. Let’s use the below Flow to exemplify this. It iterates over messages in an array and each message is processed by two ‘Processing’ modules.

Let’s assume that the input to the Array Split module is an array with ~50 messages. Now let’s run this Flow in a remote session and enable debugging on the two Math Processing modules. What you will see in the Debug window is most likely a large number of messages from the first processing module followed by a mix of messages from both of the processing modules. This might be fine as long as you’re only interested in the final result, but if you get an error from the second processing module it is very hard to know which of the messages from the first processing module that caused that error.
This is a hypothetical example, but scenarios like this do occur sometimes, where it’s hard to follow the sequence of messages through multiple modules. It could then be advantageous to temporarily disable queues, either on just a one or a few modules, or on the whole Flow.
There is a Disable Queues setting both on each module and also in the Flow settings. The latter will turn off queues on all modules. In most cases you will only use these settings when debugging a Flow, then make sure to uncheck these settings before deploying the Flow, since in almost all cases queues will give you better working Flows.
Search Documentation
Page Sections