The Flow Studio
Introduction
To open the Flow Studio either use the  in Main Menu, or open existing Flow using the (
 ![]() ) icon or read-only (
) icon or read-only (![]() ) symbols to open a specific Flow. Note that the read-only symbol is only shown on individual versions, so you have to expand the Flow by clicking on the arrow to the left (
) symbols to open a specific Flow. Note that the read-only symbol is only shown on individual versions, so you have to expand the Flow by clicking on the arrow to the left ( ![]() ) or on white space between the columns.
) or on white space between the columns.
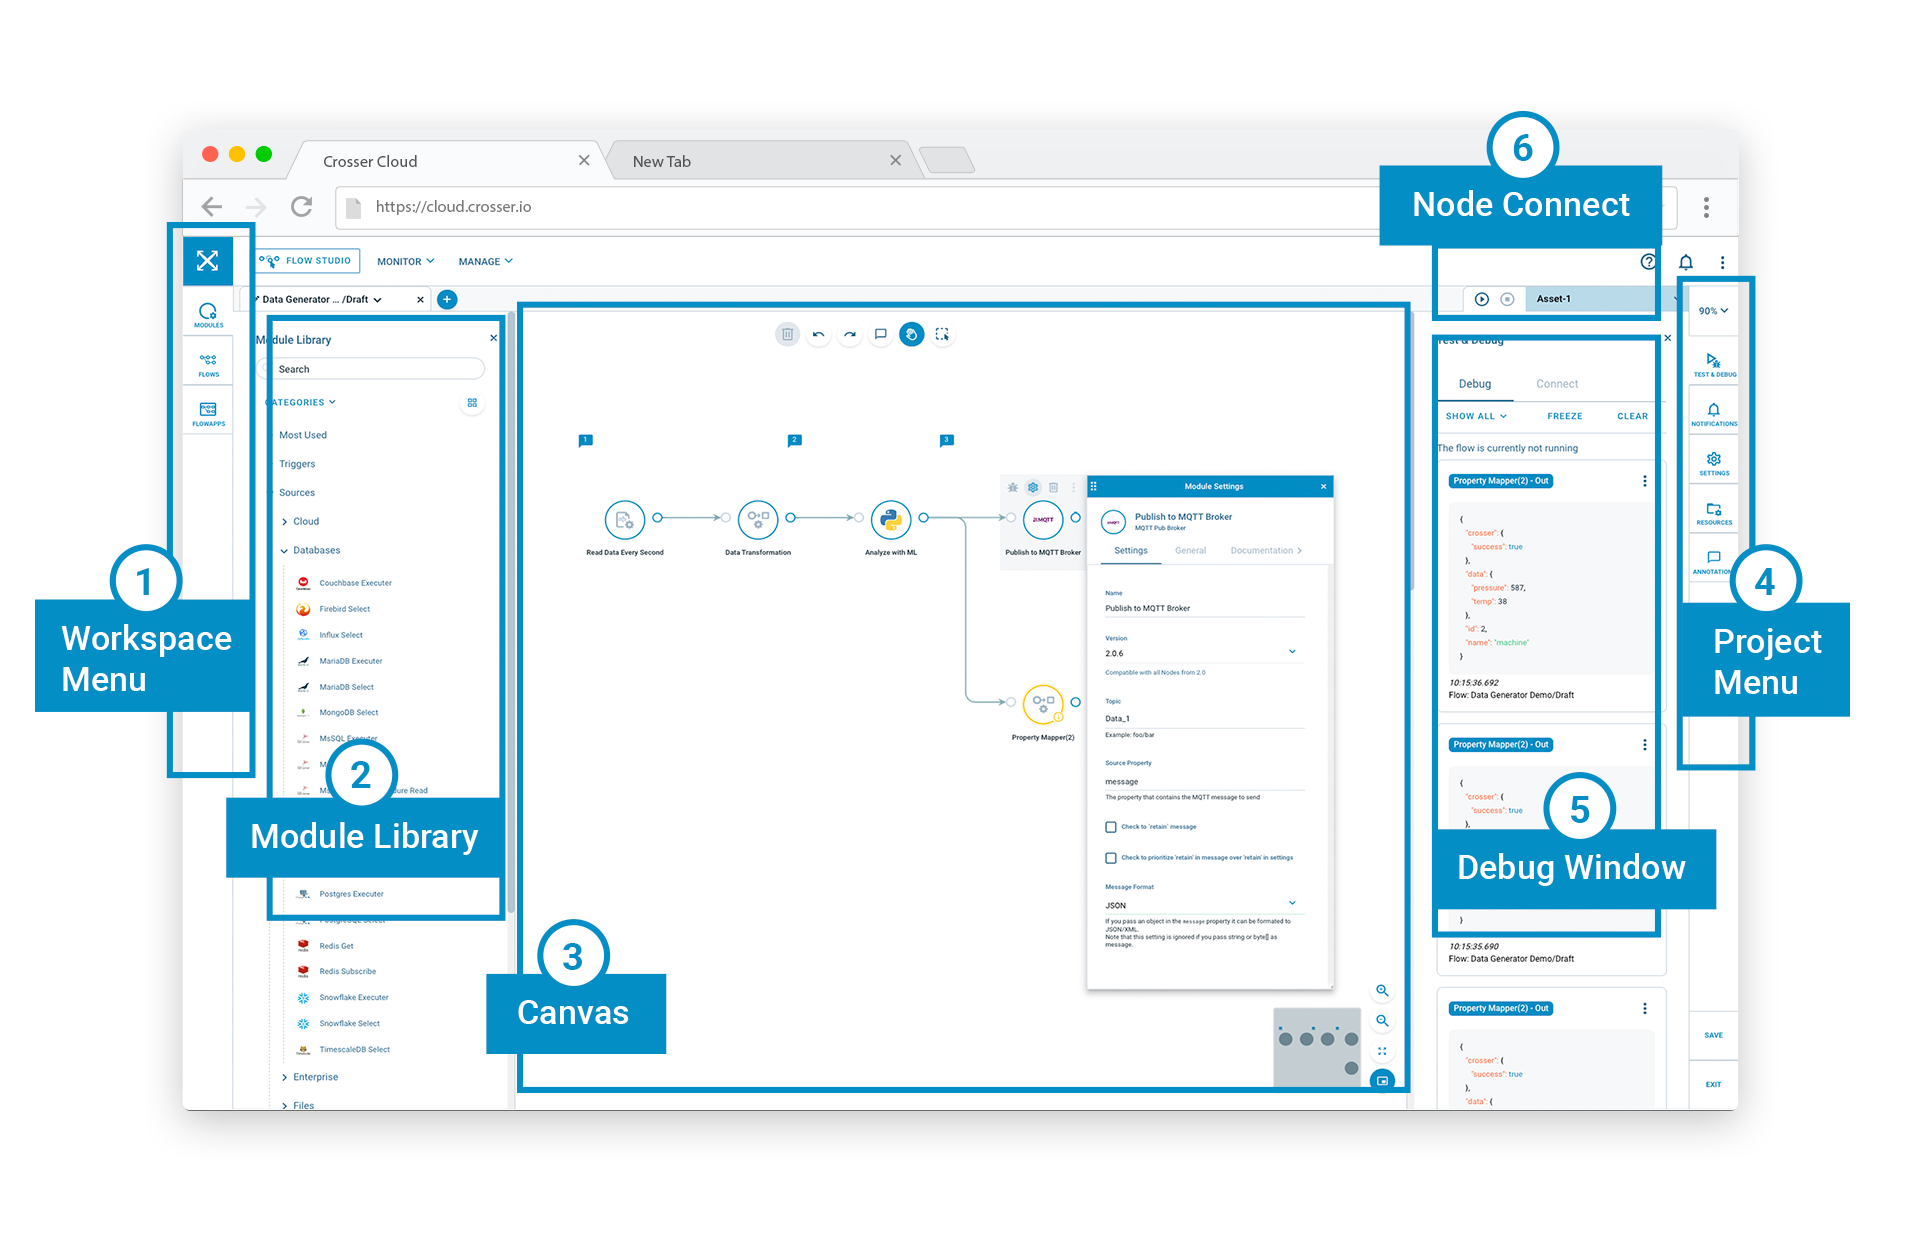
The Flow Studio has the following main sections (refer to the picture below and the following sections for more information):
-
Workspace Menu (1) - This menu is used to access things you can add to the main area. Each menu choice will open up a side panel:
-
Module Library (2) - The module library is where you find modules that you want to add to the current Flow (canvas). You can view modules of a specific type (Input, Analytics or Output) or search for modules by name.
-
Flows Library - Open a Flow for viewing or editing. The panel will show you a subset of available Flows, based on your favorite Flows. You can find any Flow by using the search function, or by selecting a category.
-
FlowApps Library - Open a FlowApp (template) to use as a starting point for a new Flow. Here you can also search or use categories to find the FlowApp you want.
-
Drawing Canvas (3) - In the center of the screen you have the drawing canvas where you build your Flow. Add new modules by dragging them from the library.
-
Project Menu (4) - On the right-hand side you have another menu that gives you access to the following tools, each with its own side panel:
-
Debug Window (5) - See the output of any modules where debugging is enabled.
-
Flow settings - Here you can change the description of this Flow version, add notes and specify settings that are common for the whole Flow, such as the Node version required.
-
Resources - Add resources from the library to your Flow or create new resources.
-
Notifications - See error and warnings from the Flow when running a debug session.
-
Node Connect (6) - At the top right you find the controls to connect, setup and control remote debugging sessions.
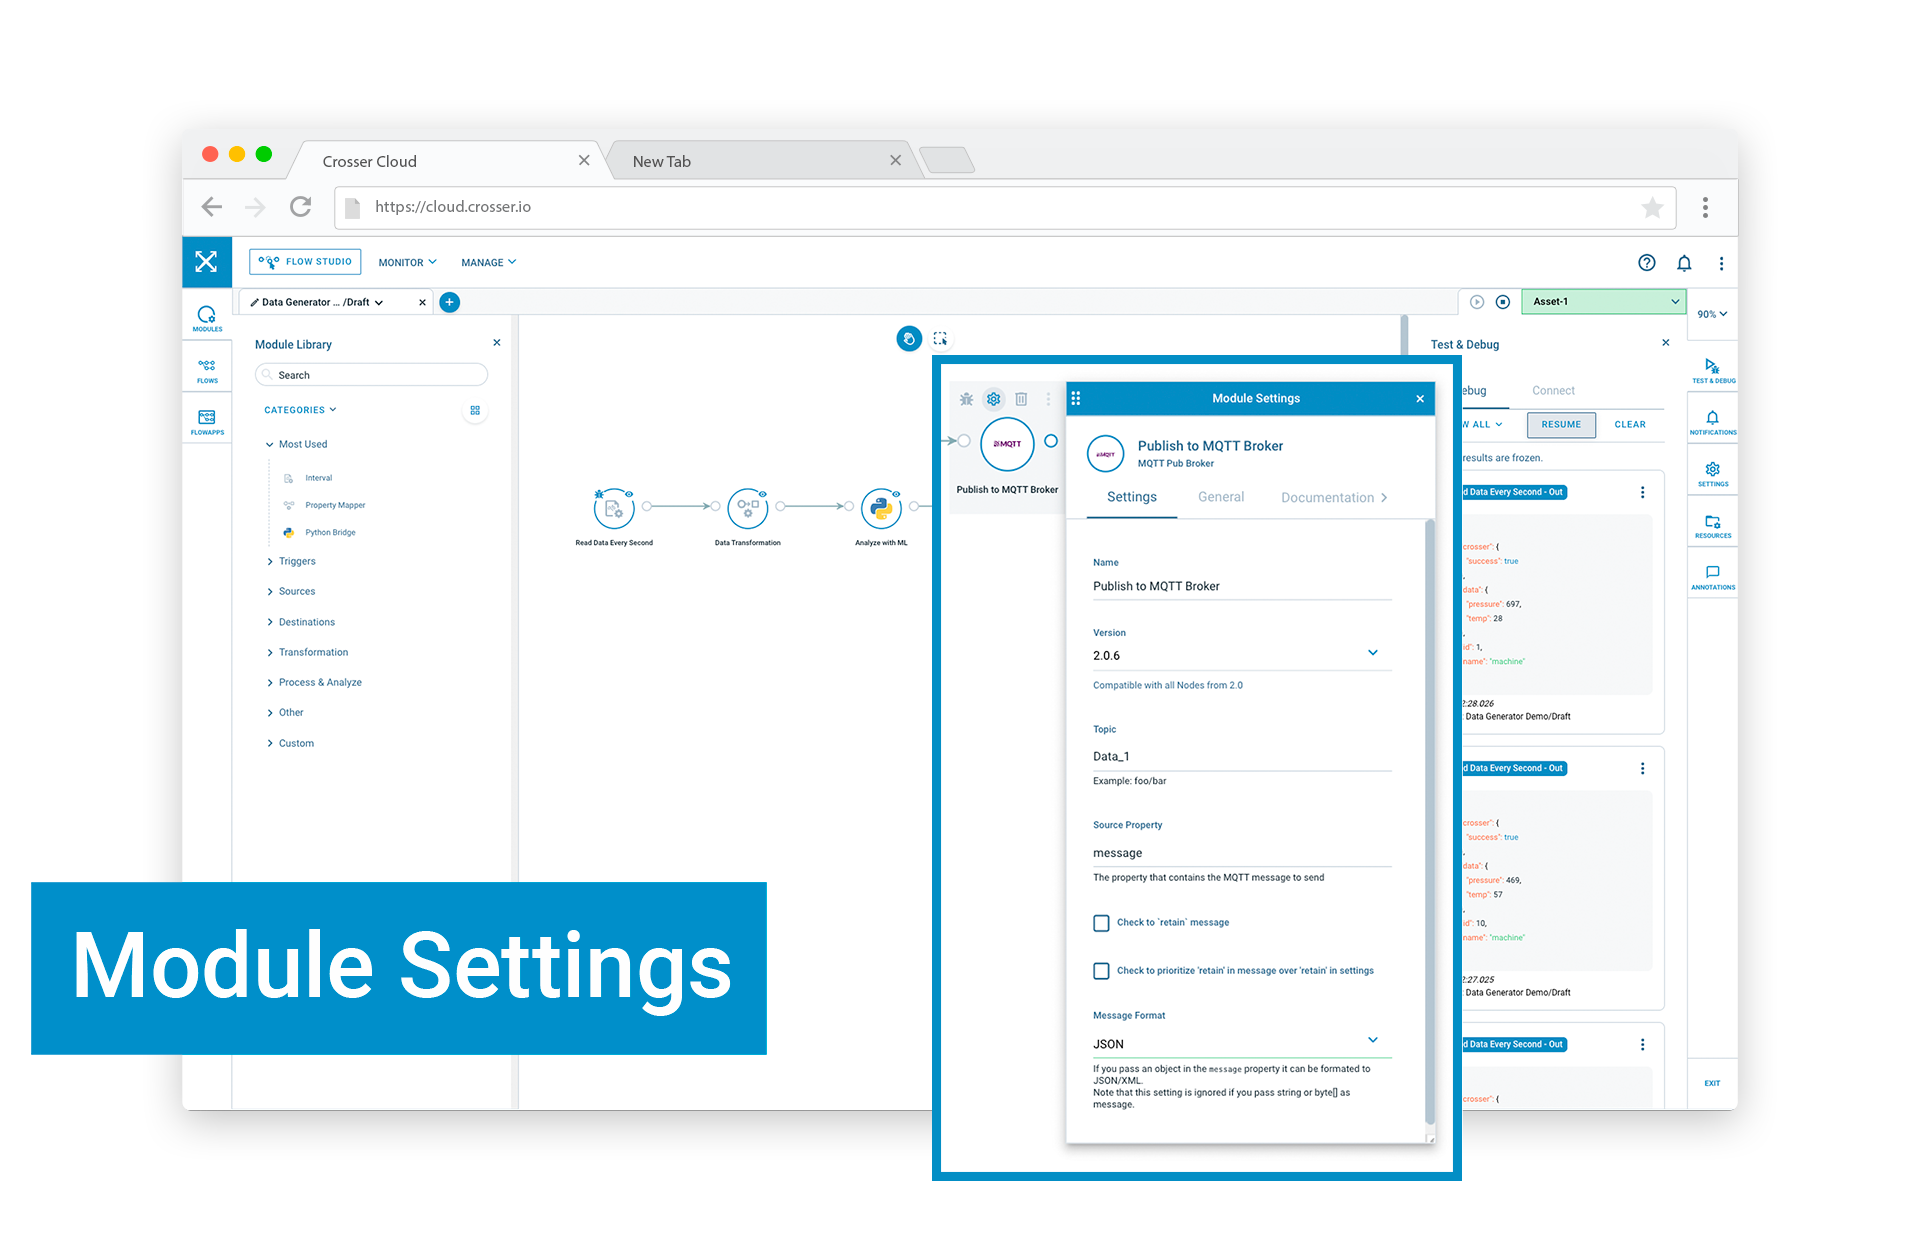
Module settings
Each module has settings that in most cases need to be configured for each use. To access these settings you hover with the mouse over the module to show the action menu. Click on the cog-wheel to open the settings. You can move the settings windows by dragging them and you can have settings panels open for two modules at a time (when you open a third, the first panel will be closed).
Creating a Flow from scratch
Let's start with a short end-to-end tour of Flow creation to get an overview. In later sections we will go through all features in more detail.
To create a Flow from scratch you have three choices:
-
Open the Flow Studio using its button. You will then get an unnamed empty Flow in the editor that you can start to work on. When you save it you need to give it a name and a description at least.
-
On the Flows page use the New Flow button (
 ). This will open a dialog where you have to provide a name for the Flow and a description. You will then end up in the Flow Studio editor with an empty drawing canvas.
 -
If you are already in the Flow Studio and have another Flow open but want to start working on a new Flow, use the New Flow (
 ) to the right of the tabs above the canvas. This will open a new tab with an empty flow, just like option 1 above.
You start building your Flow by adding modules from the library browser (left hand side). Drag them from the library list and drop them on the canvas where you want them. To connect two module start by clicking and holding on the output of the first module. All possible inputs that you can use will now be highlighted in green. Drag the mouse over the module you want to connect to and release the mouse. A line will now be added to show this connection. To remove a connection line you click on the line and then use the delete
( ![]() ) button. Often it’s a good approach to start with just a few modules and verify this part of the Flow, before adding more modules. Otherwise you risk ending up with lots of errors that may be hard to locate.
) button. Often it’s a good approach to start with just a few modules and verify this part of the Flow, before adding more modules. Otherwise you risk ending up with lots of errors that may be hard to locate.
For a step-by-step instruction on how to build a simple Flow, see Create Your First Flow. If you want to learn more about message processing and how to configure modules the first lesson in the Fundamentals training course is a good starting point.
Creating a Flow from a FlowApp
Instead of starting with an empty Flow you can use one of the existing FlowApps (templates) as starting point. You get to these by switching to the FlowApps tab on the Flows page. Here you will find examples for different use cases. By selecting a FlowApp in the list a description will be shown. If you want to use a FlowApp as starting point you click on the branch icon in the Actions column to the right of the FlowApp. This will then create a new Flow based on this FlowApp and open the Flow Studio editor. You can now adjust the Flow to your specific needs, by changing settings or adding/removing modules. It is also possible to open FlowApps from within the Flow Studio. Open the FlowApps panel using the menu on the left side of the canvas. You create a new Flow based on the FlowApp using the New Flow from FlowApp" action from the tab menu (see "Flow Actions" below).
The drawing canvas
The drawing canvas is the large space in the middle of the Flow Studio page. This is where you build your Flow by adding modules from the library and connecting them together to specify the sequence of operations you want. You add modules by dragging them from the library and dropping them anywhere on the canvas.
The modules are designed with inputs on the left side and outputs on the right side. Therefore it's natural to start with input modules to the left and then add all the modules needed, step-by-step, until you reach an output module where the messages leave the Flow.
With one exception (the Split module) modules have one input and one output. You can connect any number of inputs to the output of each module, for example if you want to send the same data to multiple destinations.
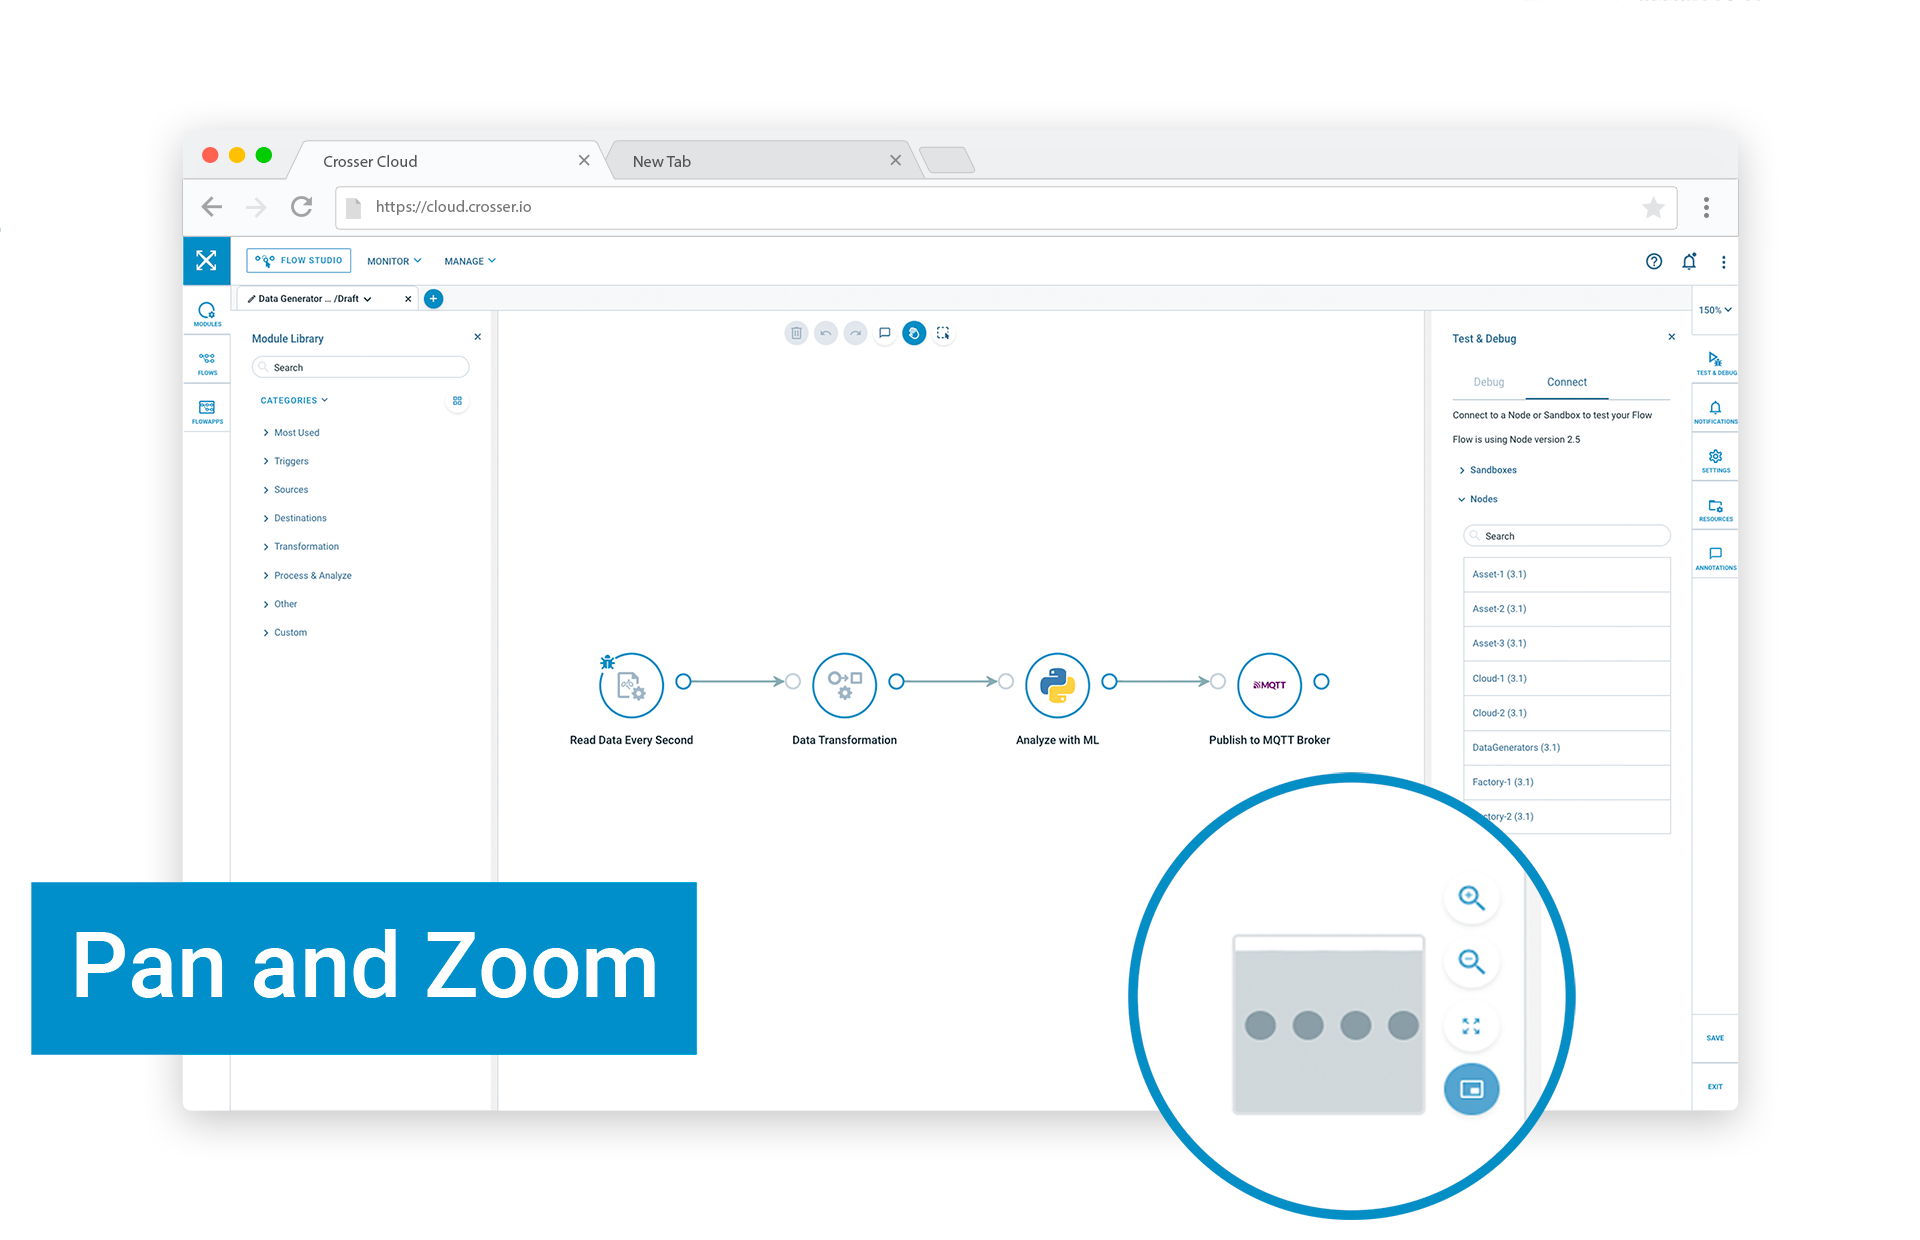
Pan and zoom
When working with large flows you can use pan and zoom to focus on a specific part. There are several ways you can navigate in the Flow:
-
Pan the Flow using the mouse by clicking and holding on some empty space. If you have zoomed in you can also pan using the mini-view in the lower-right corner of the canvas. If you don't want to use the mini-view you can close it using the button to the right of it.
-
Zoom by using the mouse scroll wheel, the zoom controls in the lower-right corner of the canvas, or the zoom menu in the right-side menu.
 Crosser FlowStudio | Functions | Pan & Zoom
Selecting and moving modules
Individual modules on the canvas can be moved around by clicking and holding, while dragging. You can also move multiple modules by first selecting them and then hold-and-drag somewhere inside a selection. You select modules by either clicking on them, use shift-click to add modules to the selection, or by dragging a rectangle around them. Rectangle selection is either done by holding down the shift key while clicking and dragging in some empty space on the canvas, or by switching to Select mode using the () button at the top of the canvas. When in select mode click-and-drag will do select instead of drag.
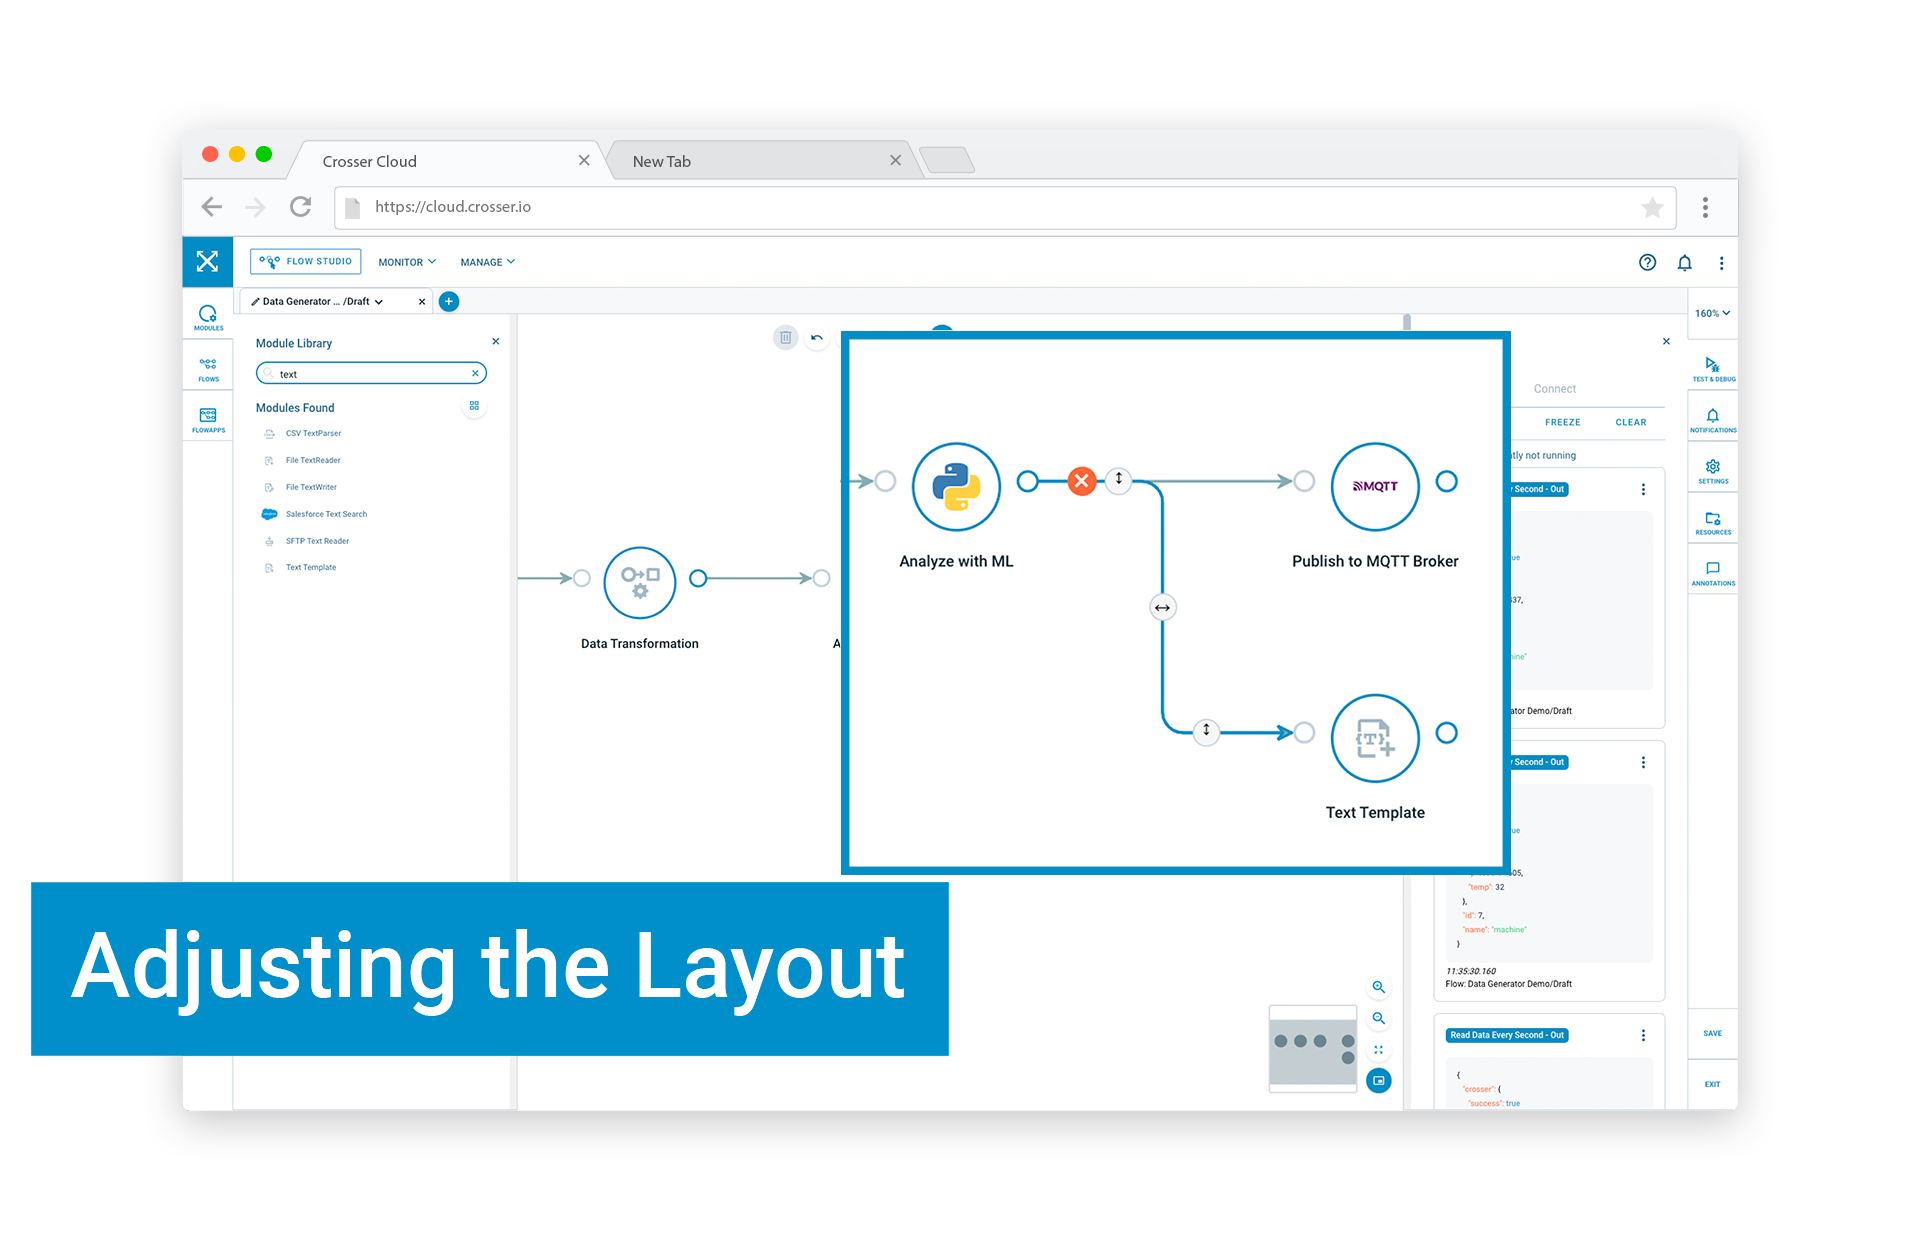
Adjusting the layout
Sometimes the automatically drawn connections between modules don't look as you would like. You can then change the layout by first clicking on a connection to select it and use the handles to change the layout. There is also a button to delete a connection.
 Crosser FlowStudio | Functions | Redraw the Path
Select a connection to adjust the layout. The module action menu can be used to duplicate modules and restore manual layout changes.
If you want to restore the default routing you can reset either the input or the output connection from a module using the module menu actions Redraw input path and Redraw output path.
Annotations
You can document your Flows by adding annotations to the canvas. An annotation is a text area that can be freely placed anywhere on the canvas. Markdown syntax is supported to style your comments.
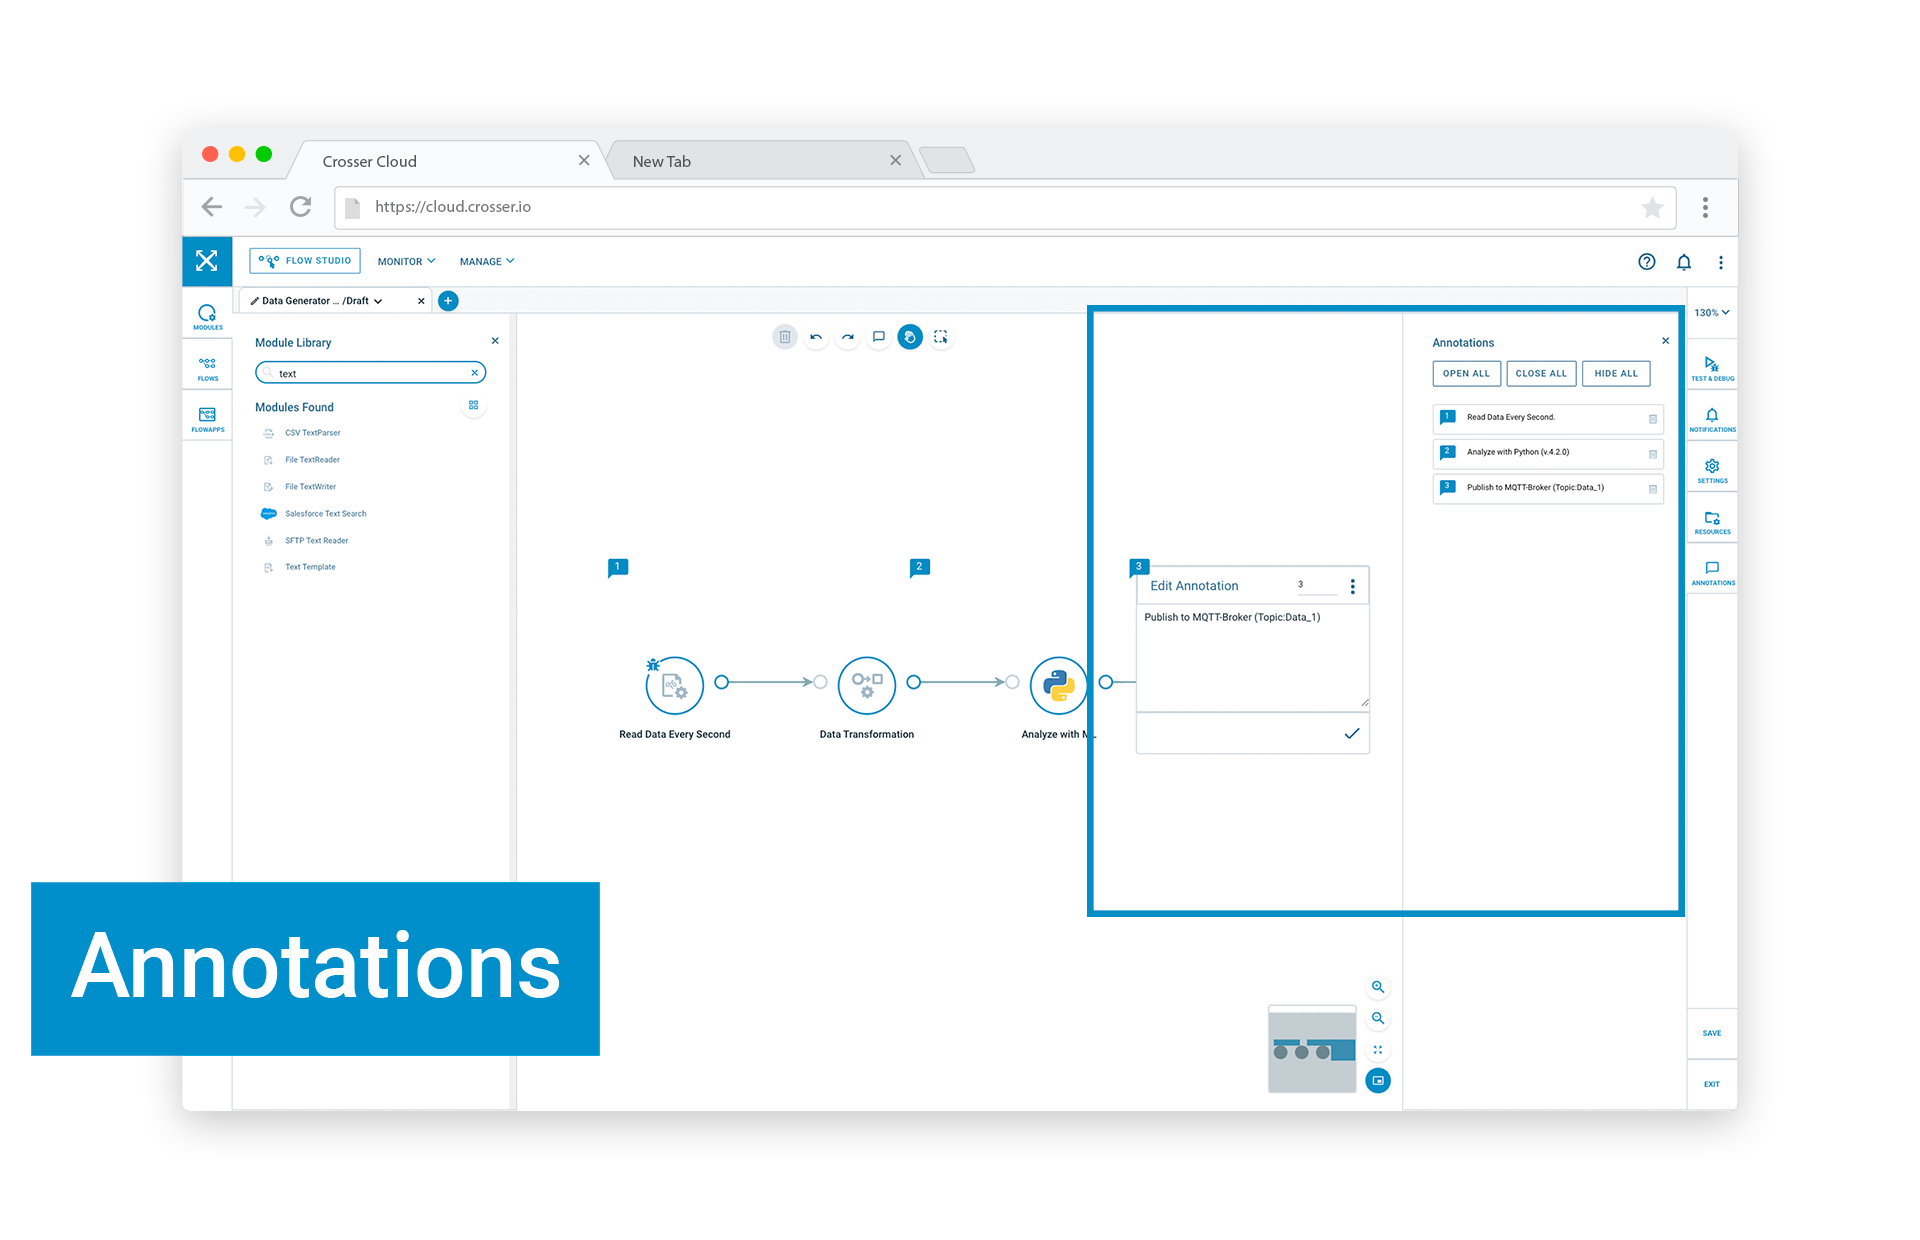
You add annotations by using the Annotation button at the top of the canvas and then drag the annotation to the desired location. Annotations can be set to always show its content (pinned) or to only show the content when hovered over.
In the Annotations panel on the right-hand side you see all your annotations and can control how they are displayed and delete them.
The order of the annotations in the Annotations panel can be changed by changing the sequence number assigned to each annotation, using the menu on the annotations.
Module actions
When hovering over a module with the mouse you will see some action buttons and get access to the module menu (see picture above). The quick actions are, from left to right:
-
Remote debug - Use this button to toggle the debug status of this module. When enabled the output will be shown in the debug window when running the Flow in a remote session (see below)
-
Module settings - Use this button to open the settings panel for the module. You can open settings for two modules at the same time. If you open settings for a third module the first panel will be closed.
-
Delete module - Use this button to delete the module
In addition the the quick actions there is also a menu with some additional actions, accessed by clicking on the three dots:
-
Duplicate - Create a copy of the module with the same settings. The name will be reverted to the default name and if you have multiple modules of the same type and name a number will be added to the name, to make all module names unique.
-
Redraw input/output path - If you have made manual changes to the connection layouts you can use these actions to restore the default layout.
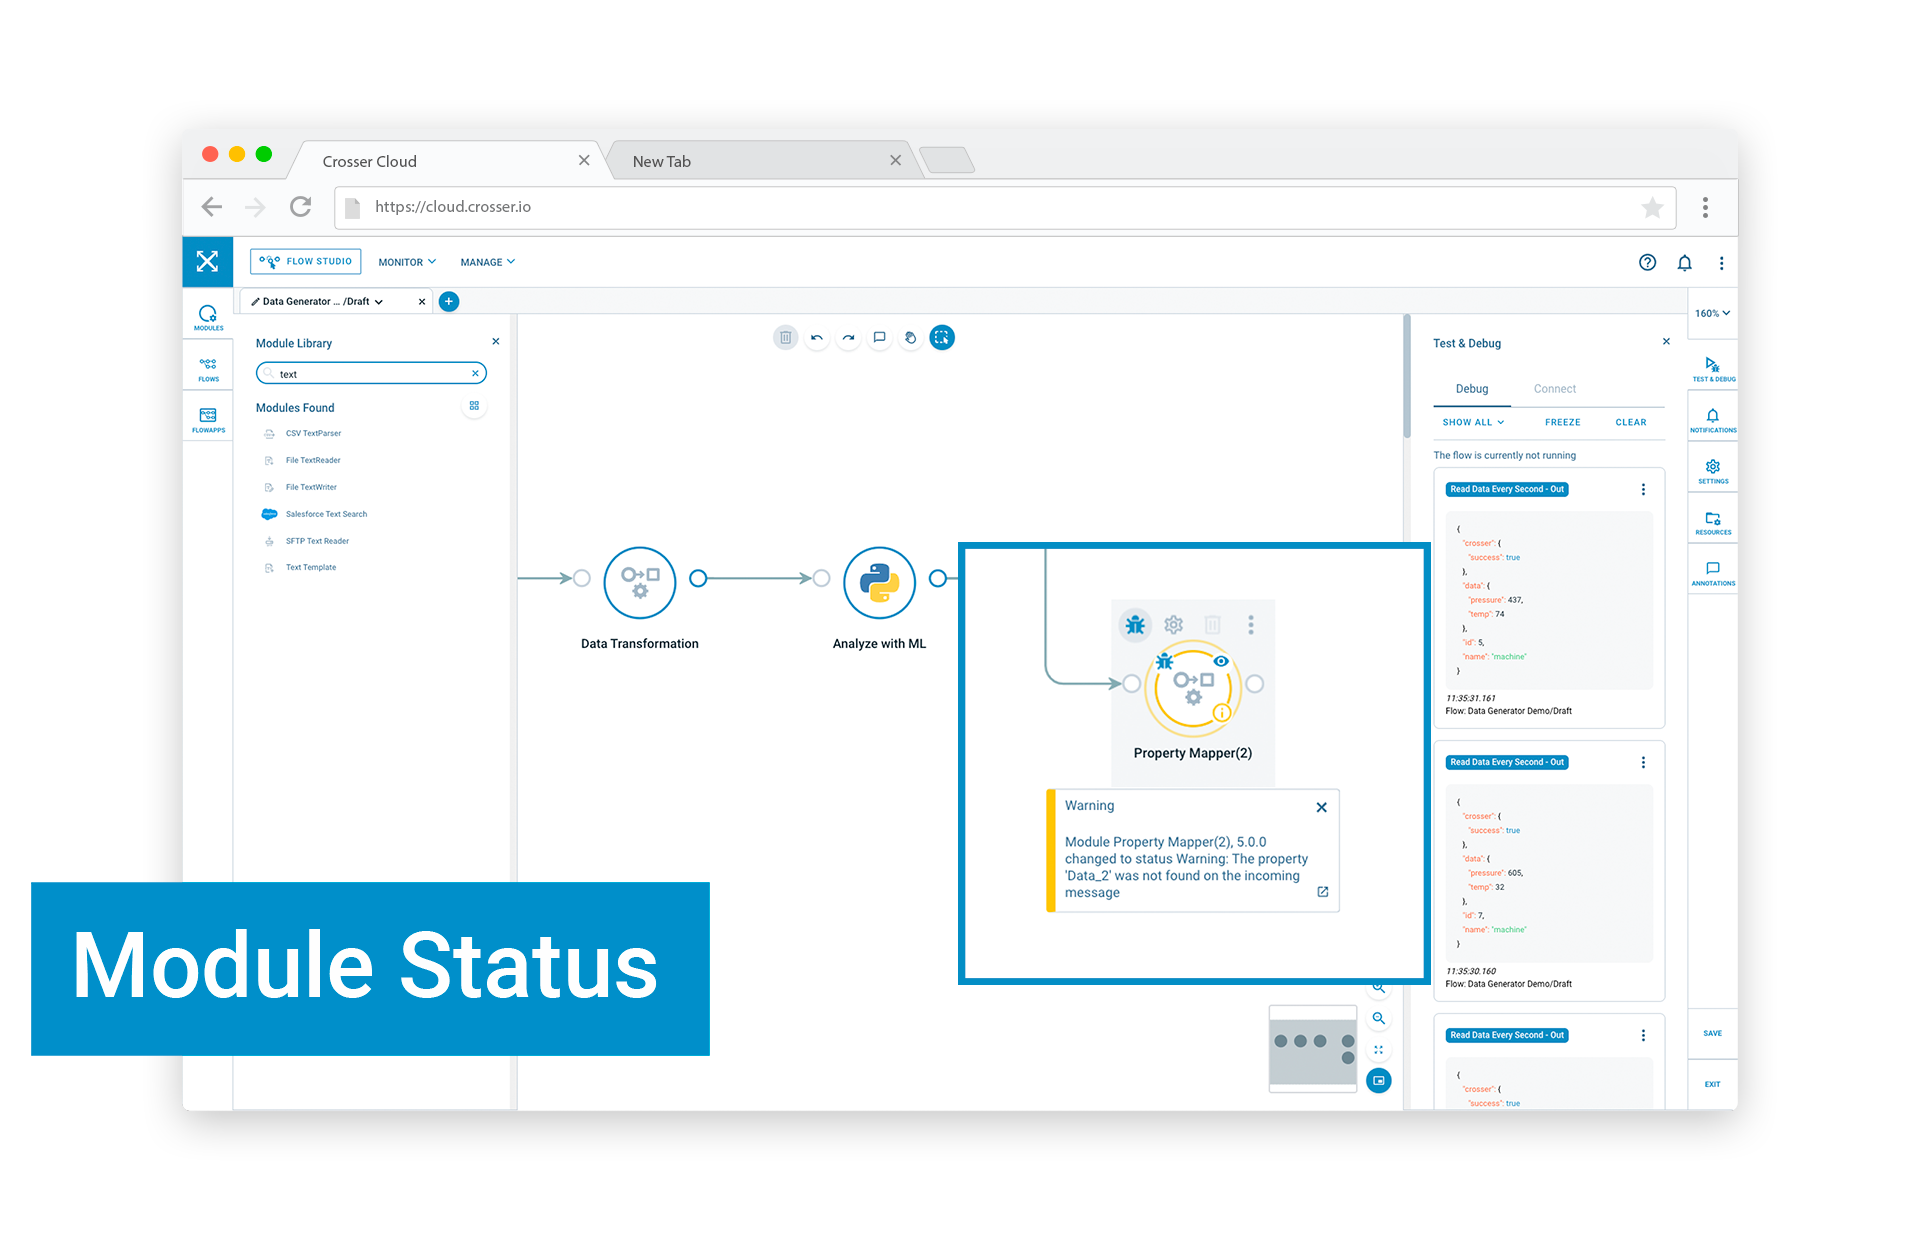
Module notifications
The status of a module is indicated using icons and color on the outer circle. The following symbols are used (see picture below):
-
 - Debugging is enabled. Output from this module will be shown in the debug window when running remote sessions
 -
 - The module has parameter overrides. You can manage parameters through the Flow action menu (see Flow Actions below)
 -
 - There are notifications from the module. The color will indicate the most severe type of notification: Red for errors, yellow for warnings and blue for information. Click on the symbol to see a list of notifications. Warnings and errors generated during remote sessions will also be shown in it's own panel and the outer ring will change color and start to pulsate. Large messages can be opened in a pop-up window by clicking on the
  symbol. Closed messages can be opened again from the notifications list. Notifications from remote sessions are also shown in the Notifications panel accessed from the menu on the right side of the tool.
Testing Flows in Remote sessions
Once you have completed a new or modified Flow it’s time to test it. You do this by connecting the Flow Studio tool to a Node. There are two options here:
-
Sandbox - If your Flow only access systems that can be reached from the Internet or has no external connectivity you can use a Node hosted by Crosser to test your Flow. We call these Sandboxes.
-
Local Node - If your Flow connects into on-premise system, e.g. PLCs or databases, you have to test the Flow on a Node that has access to these systems.
To connect the editor to a Node for testing you click on the Test & Debug button (![]() ) in the right-side menu bar. This will open up the test & debug panel which has to tabs: Connect and Debug. On the connect tab you will see a list of Nodes that are available in your org.
) in the right-side menu bar. This will open up the test & debug panel which has to tabs: Connect and Debug. On the connect tab you will see a list of Nodes that are available in your org.
Some Nodes may be grayed out because they are not compatible with the version requirements for the current Flow (see Flow settings below). Click on the Node you want to use or expand the sandbox section and click connect. When you are connected the Node will get a green checkmark and the name is shown in the top-right corner above the canvas.
You can now start the Flow using the start button () next to the name of the Node. The Flow will now be downloaded by the Node and then start executing. The panel then switches to the debug tab and the area with the Node name will get a green background to show that the Flow is running. Messages from any modules that have debug enabled (see above) will now show up in the debug panel.
You can freeze the debug window which will stop new messages to be added, if you want to look more carefully at the present messages. If you have complex messages you can also open them in a separate pop-up window using the menu in the upper-right corner of each message. Here you can also copy the message as JSON text. you stop the Flow using the Stop button () next to the start button.
Flow settings
Each Flow has some settings that controls it' behavior. You find Flow settings by clicking on the cogwheel button () in the right-side menu bar. These settings are tied to the specific version you are working on, i.e. each version can have its own Flow settings. There are also settings that are common to all versions, like the name of the Flow. These settings can only be accessed from the Flows page.
The following settings are available for Flow drafts and versions:
-
Short description - This is a description that will be shown when listing Flow versions, e.g. in the Flows panel inside the Flow Studio and on the Flows page. Our recommendation is to use this to describe what has been changed in this version. It will help your users to track changes.
-
Notes - Here you can add more detailed information on changes, or list specific instructions for running the Flow and so on. These notes are only visible within the Flow Studio.
-
Node version - Specify the minimum Node version required to run this Flow. This information will control which versions of modules that can be used as well as control the list of Nodes available for remote sessions. All new Flows will get the latest Node version by default. If your Nodes are not upgraded to a matching version you will not see any Nodes in the remote session Connect panel and you will not be able to deploy your Flow to any of your Nodes. If you have modules in your Flow that are not compatible with the selected Node version you will get validation errors, indicated with a notification symbol on the modules.
-
Halt On Error - This setting controls what happens with this Flow when there are errors. If enabled any error from a module or the Flow itself will cause the Flow to stop. If disabled the Flow will continue to run, unless the error is so severe that the Flow crashes. It will then be restarted automatically.
[Only in Node +2.6] If you don't want the Flow to continue to run when there are module errors, but still want to the Flow to be restarted, you can use the Halt On Error setting available on each module. If enabled an error in the module will cause the Flow to stop, but since Halt On Error on the Flow is disabled it will be restarted by the Node host. -
Disable Queues - If enabled all queueing of messages in modules will be disabled and modules will not accept new messages until the current message has been processed and delivered to the next module (back pressure).
This can be useful when debugging Flows with high message rates and a mix of fast and slow modules, e.g. when iterating over an array and processing messages with some modules and an external connector. With queues enabled all messages in the array will be queued in the modules before the external connector module, which typically process messages much slower. It can then be hard to follow the exact sequence of processing through the modules. With queues disabled one message at a time will be processed through all the modules.
Note! When queues are disabled the queue settings on modules, like retry and persistence can no longer be used. Queues can also be disabled on individual modules (Common settings). -
Update Modules - This is a convenience function you can use when you want to update a Flow that was built earlier. With this function you can update all modules to the latest version currently available. It is a good practice to always do this when you start working on a new version of a Flow that was created some time back, since modules are updated continuously with bug fixes and new features.
Resources
The Resources library allows you to store additional files that may be needed by your Flows. These files can be of specific types, like Python scripts or OPC taglists, but you can also store generic files, e.g. ML models or XML templates. Once a file has been uploaded you can add it as a reference to any Flow. When the Flow is downloaded to a Node, the Node will also pull down any referenced resources into local storage.
You use the Resources panel to add resources to your Flow version. To open this panel click on the resource button () in the right-side menu bar. Here you can select from the available resources and add them to your Flow. Once added you can also view the content of each resource. To add a resource, click on "ADD RESOURCE" and then select the type and then one of the available resources from the list.
If the resource you want to use is not yet available in the library you can also create new resources by using the () button inside the add panel. This will open up a separate window where you can create a new resource, either by entering the data in the UI or by uploading a file.
Notifications
All notifications reported while running the Flow in a remote session will end up in the Notifications panel that you open using the bell button () in the right-side menu. This is in addition to the display inside the canvas, where module notifications will be shown on the respective modules and Flow notifications will pop up as a toaster at the bottom of the canvas.
Flow actions
In addition to designing and testing Flows in the Flow Studio you also have access to the most common Flow management actions through the menu in the tab for each Flow. These are also available from the Flows page. Before you can use any of the actions in this menu the Flow must be saved. You will be notified if that is not the case.
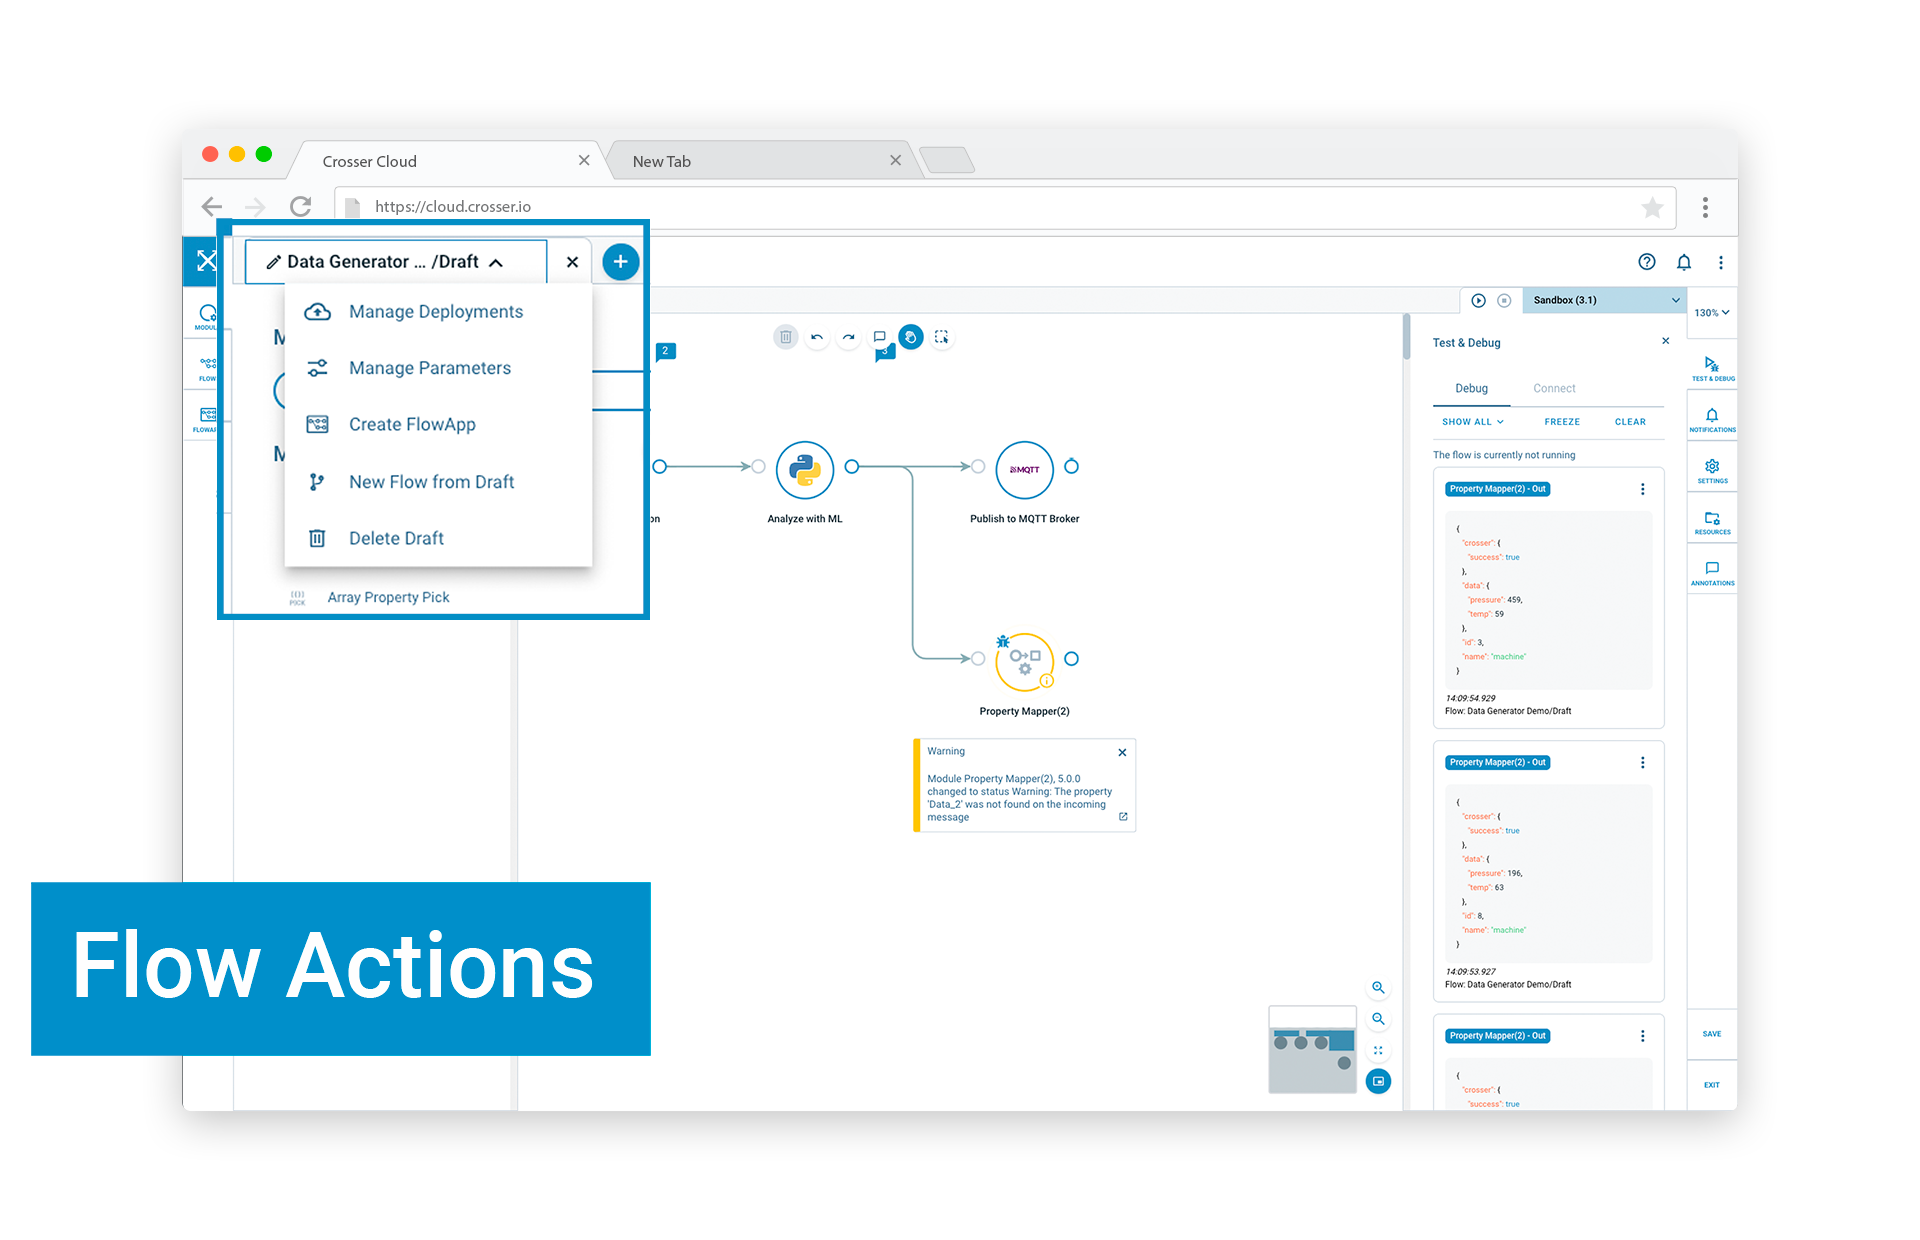
The Flow management menu
-
Manage Deployments - This will open up the Flow deployment tool where you can deploy the Flow you just built to any of your Nodes. Note that if you deploy a Flow it will be converted into a read-only version, so no further edits can be made.
-
Manage Parameters - Opens up the parameters tool where you can add or change parameter overrides on any of the modules in your Flow.
-
Create FlowApp - Create a new FlowApp from your Flow. The new FlowApp will be added to the FlowApps library for later re-use.
-
New Flow from Draft/Version - Use this to create a copy of your Flow, as a new Flow
-
New Draft from Version - This action is only available on read-only versions where there is no editable draft. Use it to create a new editable draft.
- Delete Draft/Version - Delete the current Flow draft or version. Note that a Flow version cannot be deleted if it is deployed on Nodes. If you want to delete the whole Flow, including all its versions, this can only be done from the Flows page.
Search Documentation
Page Sections