Using the Python Bridge module
Introduction
Crosser offers two ways to run Python code from within a flow: the IronPython and the Python Bridge modules.
The IronPython module
The Crosser flow engine is built in .NET and Python is not a native .NET language. The IronPython module uses a Python interpreter running inside .NET. This means that all processing happens within .NET, which may improve performance. It does come with several limitations though:
- Python version 3.4
- Only a subset of the standard libraries are available
- No external libraries can be used
- .NET data types are not converted to corresponding Python types
The IronPython module is still useful when you just want to make small modifications to your messages and you don't find suitable modules in the library to do that. You can find more information about IronPython here .
The Python Bridge module
In order to overcome the limitations with the IronPython module, the Python Bridge module is available. This module accesses a standard Python 3.11 environment running outside of .NET. The code that you provide through this module is executed in this external environment and message data is transferred between these environments.
The advantage with this setup is that you now have access to a standard Python environment and can do more or less anything that you expect with Python from within a flow. There are some consequences of this implementation that you need to be aware of though. This article will explain these, so that you can get your code up and running more easily.
The Crosser Node Docker image comes with Python 3.11 pre-installed. If using the Windows service version of the Node, the Python environment must be installed locally and the default configuration of the Node must be modified to point to this local Python installation. See the installation guides for more information.
In the Docker version of the Node the communication between the flow module and the Python environment is managed internally through inter-process communication. On the Windows service version this communication is done through grpcio and protobuf. The module will install the required packages itself.
Message formatting
We now have two separate execution environments: .NET and Python, and they don't use the same data types. Therefore flow messages need to be converted when sending flow messages to and from the Python code. This is done using JSON serialization.
Flow messages can in most cases be serialized to JSON, so sending data from a flow to the Python code is usually not an issue. One exception is binary data, which needs to be base64 encoded before it can be serialized. It's when sending data produced by the Python code back to a flow that problems may occur, since there are custom (but common) data types used in Python which cannot automatically be serialized to JSON. A typical example is when using Numpy arrays, or Pandas Dataframes. These need to be explicitly converted to standard Python types before they can be serialized.
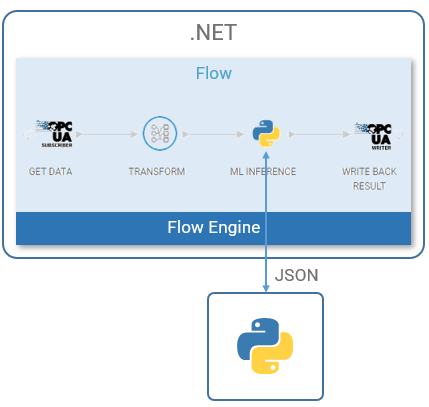
Example flow that uses the Python Bridge module
Preparing your code
The Python Bridge module has a single code window where you can enter any valid Python code. There is however some 'structure' that you should be aware of.

The three 'sections' of the Python Bridge code window
Initialization
Any code that you add at the top in the code window will be executed once, when the flow starts, just like with any Python program. This is where you import packages, define and initialize variables that hold state between messages.
There is an alternative way to add initialization code: by defining an initialize(module) function. This function is called once when the flow starts. The only reason for using the initialize function is to get access to the module object, which is used to send data to the next module. So if you need to send data from your Python code without being triggered by an incoming message, you have to implement the initialize function . See below for an example of using this function.
No initialization code is required by the module.
Message processing
Each time the Python Bridge module receives a message from a previous module, the msg_handler(msg, module) function is called. It has two arguments: msg holds the message data (in a dictionary), and the module object is used to send the result of your Python code to the next module(s) in the flow (by calling module.next(data) ).
There must always be a msg_handler function defined, even if it's not used.
The msg argument in the msg_handler function contains a Python dictionary with the message data. Let's take a look at a sample message:
{
    "id": 5,
    "name": "machine",
    "data": {
        "temp": 31,
        "pressure": 923
    },
    "crosser": {
        "success": true
    }
}
We can then reference the data in this message using normal dictionary syntax, for example: if msg["id"] == 5: msg["data"]["temp"] = 0 As seen in the above example we can both read and write the values in our message. We can also add new properties: msg["data"]["status"] = "ok"
To send the result of your processing in Python you call the module.next(msg) method, where msg is either a modified version of the incoming message, or a new message that you have created in your code. The most common scenario is to send a dictionary to the next module. You can also send a single value, but then a target property must be specified (see below).
Note: the "crosser" object is added automatically to the output messages of all modules, based on the success of the operations performed by the modules. You can read this data in your code and take actions based on it, but you cannot write to this object. The Python Bridge module will add a new "crosser" object to the output, independent of any changes you have made with your code.
Code structure and testing
If you only have a small amount of Python code it's fine to just add it to the msg_handler function. However, for more complex code it is recommended to keep your custom code in separate files that you upload to the resource library in Crosser Control Center, see below. Then use the msg_handler function to adapt message data for your custom code and then call functions in your imported files. This will also simplify testing. Even though the Flow Studio is a great tool for verifying flow processing with live data, it is not a full code debugger. Therefore you should only use it to test the Crosser specific parts of your code. Custom algorithms and other complex code is better tested outside the Crosser environment, using proper code development tools. When you have verified your code and added it to the resource library you can import it in the Python Bridge module and then verify only the Crosser adaptations in the Flow Studio.
Apart from seeing the final output of your code in the Flow Studio debug window, as the message sent to the next module, you can also use print() statements anywhere in your code. The output of these print statements will show up in the debug window as regular debug messages with a log label. The debug window is designed to show messages, therefore the output of any print statements is wrapped in a message-like structure, where the output from print is assigned to a data property. This introduces some limitations on what you can print, anything that cannot be presented as a single line string will not be shown properly, so you may need to prepare your print statements with this in mind.
When testing your Python code outside the Crosser environment it can be useful to test it by calling it in the same way as when running inside Crosser. To do this you can create a simple 'test harness' to emulate the module object used in Crosser. Create a new Python file based on the below sample to call your code in the same way that it's done in the Python Bridge module:
# Test 'harness'
import <code with msg_handler> as test

class Module:
    @staticmethod
    def next(msg, debug=True):
        if debug:
            print(msg)   # Replace with whatever verification you want to use

module = Module()

# Generate test data
msg = {'a': 1, 'b': 2}

# Call the Python Bridge code
test.msg_handler(msg, module):
Source and target properties
By default the msg dictionary sent to the msg_handler function holds the complete message. If you are dealing with complex messages where your code will only use a part of that message, or you only want to give your code access to a subset of the message to prevent unintentional modifications to other parts, you can use the Source Property setting.
If we use the example message above and set the Source Property to data , the msg variable will hold the following data:
    {
    "temp": 31,
    "pressure": 923
}
So instead of referencing the "temp" value with msg["data"]["temp"] , you can now use msg["temp"] . With complex hierarchical structures where your code only needs access to a sub-hierarchy, this can simplify your code a lot.
In the same way you can also use the Target Property to control which part of the outgoing message your code is allowed to change. Whatever you send in the call to module.next(msg) will be added to the target property, either a complex dictionary, an array or a simple value. If your return message is not a dictionary you need to specify a target property. As a consequence you can only send dictionaries if the target property is empty, and these will be added to the root of the outgoing message (replacing the input message).
Importing libraries
All the standard libraries are available and can be imported just like normal, by adding import statements. It is also possible to use external libraries that need to be installed in the local Python environment. Libraries that need to be installed shall be listed in the Packages settings window. Here you can enter a list of libraries that need to be installed. When the flow is started the node will first install any libraries listed, by running pip install on each of the entries in the Packages window.
The node will use the full lines in the Packages setting when calling pip install , thus making it possible to add command-line arguments. For example, specifying a specific version of a library (e.g. numpy==1.20.3 ) or a custom repository with --extra-index-url <url>.
Please note that the Packages setting is only used for installing packages, you still need to import them in your Python code.
The Node Docker container does not include the development tools. Hence, only pure Python packages, or packages where pre-compiled binaries exist for your platform can be installed. The standard PyPi repository has less pre-compiled packages for Arm CPUs and then you might need to specify alternative repositories to find the packages you want.
Using zipped libraries
The pip tool can install packages from local directories, which is useful in cases where you have added custom packages manually on the Node host. Relying on locally installed packages will however make your flows less useful, since they will require custom configurations of any Nodes where you want to deploy the flow. Since a package is typically a directory structure it's not practical to use the resource library in the Crosser Control Center to distribute such packages.
An alternative then is to use the feature that Python can import from zipped libraries. The zipped library file can be distributed to Nodes by adding it to the resource library (see below). In order for Python to find the library you must add another path in the search order used by Python. For example, if my custom package is loaded as the resource mypackage.zip you need to add the following lines to your code:
import sys
sys.path.insert(0, './data/flowresources/mypackage.zip')
import my_library  # Name must match what is inside the zip file
You can read more about using zipped libraries here .
Resources
The resource library in Crosser Control Center is used to hold files that are needed by flows. You can upload any file and then reference this file when configuring your flow. When a Node receives the flow it will also download any resources found in the flow into local storage. This feature can be used to add Python code files that can then be imported in your code. All resource files will end up in the ./data/flowresources directory in the local file system. The Python interpreter used by the Python Bridge module is set up to look for packages in this directory, so you can use standard import statements to import these files. When uploading Python files you should set the type to Python Script , to make it easier to find these files when browsing the library.
If you upload other files, such as machine learning models, use the generic File type.
Examples
Machine learning
In this first example we will use a machine learning model to make predictions based on message data. The model is a Tensorflow lite model and the file is uploaded as a resource file ( mlp_100.tflite ).
This is what the code in the Python Bridge module looks like:
import tflite_runtime.interpreter as tflite
import numpy as np

MODEL_FILE = "data/flowresources/mlp_100.tflite"

# Load TFLite model and allocate tensors.
interpreter = tflite.Interpreter(model_path=MODEL_FILE)
interpreter.allocate_tensors()
print("*** Loading saved model:", MODEL_FILE)

# Get input and output tensors.
input_details = interpreter.get_input_details()
output_details = interpreter.get_output_details()

def msg_handler(msg, module):
    global interpreter
    data = np.array(msg['data']['values'], dtype="float32")
    if len(data) != 0:
        interpreter.set_tensor(input_details[0]['index'], [data])
        interpreter.invoke()
        prediction = float(interpreter.get_tensor(output_details[0]['index'])[0][0])
        module.next({'actual': data[-1], 'prediction': prediction, 'abs_error': abs(data[-1] - prediction), 'samples': len(data)})
A few things to notice:
- Packages are imported and the Tensorflow environment is initialized outside the msg_handler function.
- The interpreter object is referenced as a global variable in the msg_handler function (not strictly necessary since we are not assigning values to it, but good practice).
- The message data is casted to an numpy array, to match the requirements of the model.
- The prediction is casted to a standard float type to make it JSON serializable.
- The message to send to the next module is created in the call to module.next().
Data generator
The normal use case is to use the Python Bridge module to process flow messages, i.e. the Python code is executed each time the module receives a message from previous modules. However, there are situations where you might want to send an output message without having received any message. This could for example be when you want to get data from an external source and deliver it as input data to a flow. Using the OpenCV library to get data from network video cameras could be such a use case. A simpler but still relevant use case that we will look at here is to build a data generator in Python to provide our flow with simulated data.
For these types of use cases, where we don't receive any incoming messages, we cannot use any code in the msg_handler function. Remember though that this is a required function, so it must still be there, but you can have a simple pass statement, to make it a valid function. Instead we have to put our code in the optional initialize function, in order to get access to the module object that will allow us to send data to the following modules.
Let's create a data generator that outputs a sine wave, by sending a message every second:
import math
import time
PERIOD = 60 # Seconds
def initialize(module):
    t = 0
    result = {}
    while True:
        result["value"] = math.sin(2*math.pi*t/PERIOD)
        module.next(result)
        t += 1
        time.sleep(1)
def msg_handler(msg, module):
    pass