The Databricks Publisher Module
The Databricks Publisher module is used to initiate transfers of files in a staging area into a Delta table. In order to use this module you first need to transfer your data to the staging area. If you want to upload streaming data you must also first store this data in local files that are then uploaded to the staging area. This document will explain how to build end-to-end pipelines with the Databricks Publisher module.
Transfer streaming data to Databricks
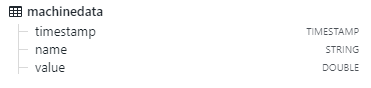
As an example we will use streaming data from an OPC UA server, but the same concept can be used with any streaming data source. We will use a simple Delta table called ‘machinedata’, that stores one sample for one senor in each row:
When uploading files to Databricks several file formats can be used, we will look at two examples: Parquet and CSV files.
Using Parquet files
Parquet files cannot be appended to, so we first need to roll-up data into mini-batches inside the flow and then write each batch as a Parquet file. When a new file has been created we can upload it to our staging area. Currently the Databricks Publisher module supports AWS S3 and Azure Datalake gen2 as staging areas. When a file has been uploaded to the staging area we are ready to trigger the Databricks Publisher to ingest the file into the Delta table.
We then end up with a flow that looks like this:

A few comments on this flow:
- The Property Mapper (“SELECT DATA” ) is used to create an object with the three values we want to store in the database (timestamp, name and value).
- An Array Join module (“CREATE BATCHES”) is used to roll-up data in memory into batches. You can either collect data over a time period, or a given number of samples. For each batch we get an array with the collected values.
- The Parquet Writer module will take the array of samples and write it to a Parquet file in local storage. The output will have the filename of the created file.
- The AWS S3 Bucket Writer module (“UPLOAD FILE TO STAGING AREA”) is configured to upload a single file. Here the Source Property must match the Target Property in the Parquet Writer, so that it finds the filename to upload. We have also enabled Delete File(s) After Upload, to make sure we don’t fill up local storage with temporary files. The Databricks Publisher module expects the reference to the staged file to be available on the property databricks.filenames, hence we need to set the Target Property to this value.
- Finally, the Databricks Publisher module will receive a reference to the staged file from the S3 Writer. Here we need to configure the following settings:
- Staging Credential - Credentials for the staging area, same as in the S3 Writer.
- Databricks Credential - Access token generated in the Databricks portal.
- Databricks Workspace URL
- Databricks Cluster ID
- File type - PARQUET
- Table - Name of Delta table
Using CSV files
The main reason for using CSV files, instead of Parquet, is that data can be appended so we don’t need to create batches in memory. This could be an advantage when using large batches. On the other hand CSV is a much less efficient way of storing data, so the amount of data that needs to be uploaded will be larger.
Below is an example of the above flow, adjusted for CSV files.

The only change related to the choice of file format is that the Array Join and Parquet Writer modules have been replaced with a CSV StreamWriter module. This module is configured to rotate files based on time.
We have also switched to using Azure Datalake as the staging area, which is applicable independent of the local file format used.
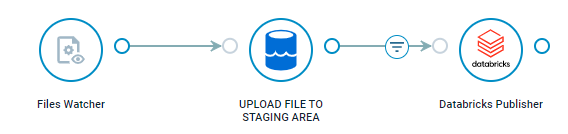
Transfer local files to Databricks
If your data already resides in local files in one of the formats supported by Databricks you just need to upload them to a staging area and then publish them with the same Databricks Publisher module as we used above.
For this use case you just need to provide the path to the local file as input to the staging upload module. As an example we can monitor a Watch folder with the Files Watcher module, so that it will give us the path to any added files.